| View previous topic :: View next topic |
| Author |
Message |
Gary Tipping
Registered User
Joined: 01 Jan 1970
Posts: 65
|
 Posted: Tue Jan 26, 2021 9:11 pm Post subject: Olympic Phase 2 - 900 HLR - Build Diary Posted: Tue Jan 26, 2021 9:11 pm Post subject: Olympic Phase 2 - 900 HLR - Build Diary |
 |
|
Hello,
It was back in June 2020 that I spotted 900 HLR on ebay, a bit of negotiation to include delivery from the south coast and I had 'won' it. I've always admired the Olympic, when I've seen it at various car shows over the years, usually when I've been looking at the Fairthorpes. Having grown up in Chalfont-St-Peter, I had several friends who built and ran Electrons, so always keep an eye on them.
I had not long finished the build of an early 90's aluminium bodied Westfield, and felt it was time to move it on and start another project. As it had never been built, and was one of only 135, it attracted a lot of interest n the kit car community, and was featured over two months in Complete Kit Car.


Due to Covid restrictions, I bought the Olympic without actually seeing it. What I had bought was a heavily 'modified' shell and an MX5 in bits, minus the body shell. When it arrived, with rose tinted glasses firmly on, I thought 'that doesn't look too bad'

My first thoughts were to carry on with the conversion to MX5 parts, but I soon changed my mind and started planning to return it to pretty much as it could have been in 1964. At this point I had never had a close look 'under the skin' of an Olympic, and hadn't realised just how much had been cut away to make way for the MX5 front subframe. The wings had been flared, with a lot of body filler, so having sourced 4 wings, engine compartment floor, inner wings and a new sub frame from Keith Hamer, I set about cutting even more out of the shell.

I first mounted the shell on a home made rotisserie and set about filling, what seemed like hundreds of random holes in the floor. having fixed and undersealed the underside I returned the car to level and set about the wings.

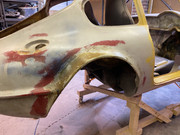
Many hours of cutting, bonding in the new wings and blending them in, but I'm much happier with the original shape.

I thought I would leave the engine compartment panels, to give me good access to do anything that would be easier standing in the engine bay.
I then made a couple of decisions, that have taken a lot of time and effort, I just hope it was worth it.
The first was to move the steering column to the centre of the driving position.
Not too difficult in it's self, but then the instrument binnacle looked odd being off set to the steering wheel. What followed was a whole lot more, cutting, glassing and blending.


Seems to have worked out. the binnacle is now smaller, but pretty much on centre. Another knock on from that, is that I'll have to modify the inner wing to clear the re positioned steering column.
The other decision, was to fit Bedford CF bonnet hinges, as shown in Olympic Running. I built up some 'cheeks' in the engine bay, to support them, using Alucabond, aluminium composite material, it's light, rigid and easy to work with. Sounds easy if you say it quick, but getting them in the correct position to support the hinges at the correct angle, did try my patience!

More to come soon, and another 'interesting' decision! |
|
| Back to top |
|
 |
Dave-M
Registered User
Joined: 20 Jan 2006
Posts: 377
Location: Yorkshire, England
|
| Posted: Wed Jan 27, 2021 11:15 am Post subject: Olympic |
|
|
Gary,
This has the makings of an excellent post and I am looking forward to future additions.
Do you want to keep this post clear and just show your progress? If so I will delete this and leave it for you to continue.
Any comments or questions about this post I will ask in a separate post.
Regards, Dave
_________________
Ph.2 Ford 1500 GT
GT with Rochdale Chassis |
|
| Back to top |
|
|
Alan Smith
Registered User
Joined: 10 Jan 2016
Posts: 90
Location: Littleborough, Lancashire
|
| Posted: Wed Jan 27, 2021 3:50 pm Post subject: |
|
|
This is a great Build Diary. Thanks for posting it Gary 
It looks like you have made excellent progress and now it has got to the interesting stage where decisions have to made about the spec.
Good luck with it all.
_________________
Phase 1R Olympic
MM 1098 Engine & Gearbox |
|
| Back to top |
|
|
Gary Tipping
Registered User
Joined: 01 Jan 1970
Posts: 65
|
| Posted: Wed Jan 27, 2021 6:12 pm Post subject: |
|
|
Thanks Dave and Alan, I'll keep it going.
Please feel free to comment on here, it's all part of the story.
Cheers
Gary |
|
| Back to top |
|
|
Dave-M
Registered User
Joined: 20 Jan 2006
Posts: 377
Location: Yorkshire, England
|
| Posted: Wed Jan 27, 2021 6:15 pm Post subject: Olympic |
|
|
OK Gary, let's hope all the responders stay on topic.
Regards, Dave
_________________
Ph.2 Ford 1500 GT
GT with Rochdale Chassis |
|
| Back to top |
|
|
Gary Tipping
Registered User
Joined: 01 Jan 1970
Posts: 65
|
| Posted: Sun Jan 31, 2021 6:57 pm Post subject: |
|
|
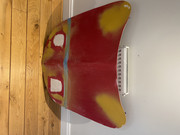
Thought I would start repairing the bonnet today. I guess the car has suffered high under bonnet temperature at some time. the original picture I have from 1965 shows some vents have been cut.

Look like they may have been cut out in a hurry!

I'm planning to fill the holes and add some louvres further back to aid cooling. |
|
| Back to top |
|
|
Alan Smith
Registered User
Joined: 10 Jan 2016
Posts: 90
Location: Littleborough, Lancashire
|
| Posted: Sun Jan 31, 2021 9:42 pm Post subject: |
|
|
Onwards and upwards Gary
Here are my shared thoughts.
I can understand the need for heat insulation to the underside of the bonnet.
I can understand the benefits of a radiator fan run-on period.
Also, a water pump run-on period if you are planning on using an electric water pump.
Another beneficial option would be to use a radiator shroud to duct the hot air from the radiator to the outside of the engine bay - downwards or sideways.
I've always been puzzled why there should be a problem with excess heat in general in the engine bay - assuming all is AOK with the engine & coolant system. There seem to be enough OEM openings to allow excess heat to escape when moving.
Maybe the issue is related to more to aerodynamics and relative pressures.
_________________
Phase 1R Olympic
MM 1098 Engine & Gearbox |
|
| Back to top |
|
|
keith hamer
Site Admin

Joined: 28 Jan 2006
Posts: 313
Location: Ellesmere Port
|
| Posted: Mon Feb 01, 2021 9:27 am Post subject: Olympic |
|
|
I have run roadgoing Olympics for over 40 years and never had an issue with under bonnet temperatures however fairly early on in my ownership of these cars it became apparent that if all the air entering the nose aperture is ducted through the radiator the whole system becomes more efficient.
During its racing career my lightweight did sprout a number of holes which 'one feels' are there to aid cooling in race conditions where everything is pushed much harder and subsequently makes more heat.


Initially it had no vents, as can be seen in the first picture, later it had extra vents in the nose, and side vents, these were presumably to let extra air into the radiator and let air out of the engine bay.
I would be careful putting vents in the back of the bonnet to extract air as that area is theoretically a high pressure zone.
_________________
Working to increase the profile of Rochdale Cars |
|
| Back to top |
|
|
Gary Tipping
Registered User
Joined: 01 Jan 1970
Posts: 65
|
| Posted: Tue Feb 02, 2021 12:40 am Post subject: |
|
|
Thank you Alan and Keith, very interesting comments.
I've bought an aluminium radiator, the largest that would comfortably fit, and mounted it in a panel that will force most of the air through the rad. It has a decent sized fan as well. the only disadvantage is the air con condenser in front of the rad (but that's another storey)
I'll post some photos tomorrow
Thanks
Gary |
|
| Back to top |
|
|
Dave-M
Registered User
Joined: 20 Jan 2006
Posts: 377
Location: Yorkshire, England
|
| Posted: Tue Feb 02, 2021 10:23 am Post subject: Olympic |
|
|
Olympic P2 under bonnet
A few thoughts before this post moves on.
The following remarks are aimed at Phase 2 Olympics with triumph front suspension only and NOT Phase 2R and Phase 1 models.
Airflow through the engine bay on P2R & P1 models presents no problem as mentioned above by both Alan & Keith, The air after passing through the radiator can continue into the engine bay unobstructed and then exit through the opening around the sump and also down the transmission tunnel.
The situation on the P2T (Triumph) is totally different, The air after passing through the radiator has to exit through the wheel arches because of the totally sealed bulkhead at the front of the engine bay.
There can be very little or no airflow through the engine bay on the P2T because there in no way for any air to get in to flow out around the sump or down the tunnel.
It may be a solution to have air inlets in the bonnet to allow some flow air of through the engine bay which would supply the carb with a cooler air and also reduce the potential of heat soak problems.
Ther is a little discussion here:- http://www.rochdale-owners-club.co.uk/phpbb2/viewtopic.php?t=949
Gary, I would value your opinions on this and should it require more discussion we could continue on the post linked above rather than clutter your build post.
Regards, Dave
_________________
Ph.2 Ford 1500 GT
GT with Rochdale Chassis |
|
| Back to top |
|
|
Gary Tipping
Registered User
Joined: 01 Jan 1970
Posts: 65
|
| Posted: Tue Feb 02, 2021 7:01 pm Post subject: |
|
|
Hi Dave,
I've put a post on the other thread re venting the bulkhead.
Cheers
Gary |
|
| Back to top |
|
|
Gary Tipping
Registered User
Joined: 01 Jan 1970
Posts: 65
|
| Posted: Thu Feb 04, 2021 10:01 pm Post subject: |
|
|
Test fitted the radiator, fan and aircon condenser.
All seems to go in ok. It can come out again now until I get the 'floor' and bulkhead bonded in.


Started glassing in the 'vents' that had been cut out of the bonnet. Still a couple of good size 'spider' cracks to grind out. Needed to bring it in to the warm as the resin seemed slow to go off.
 |
|
| Back to top |
|
|
Dave-M
Registered User
Joined: 20 Jan 2006
Posts: 377
Location: Yorkshire, England
|
| Posted: Tue Feb 09, 2021 6:19 pm Post subject: Olympic build |
|
|
| Gary Tipping wrote: |
Started glassing in the 'vents' that had been cut out of the bonnet. Still a couple of good size 'spider' cracks to grind out. Needed to bring it in to the warm as the resin seemed slow to go off.
|
Gary, how do you decide on the amount of catalyst to use?
Regards, Dave
_________________
Ph.2 Ford 1500 GT
GT with Rochdale Chassis |
|
| Back to top |
|
|
Gary Tipping
Registered User
Joined: 01 Jan 1970
Posts: 65
|
| Posted: Tue Feb 09, 2021 9:13 pm Post subject: |
|
|
Hi Dave,
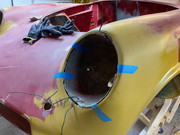
Generally I use 2% catalyst to resin, I've been glassing in the headlamp bowels today, not sure why the previous cut them out, I used 3% as it was so cold, and still had to apply some heat to get it to go off!
One headlamp bowel had been cut out in one piece, and the other in about 6 pieces, luckily they had been kept with the body.

 |
|
| Back to top |
|
|
Gary Tipping
Registered User
Joined: 01 Jan 1970
Posts: 65
|
| Posted: Thu Feb 11, 2021 6:06 pm Post subject: |
|
|
I decided at the beginning of this restoration to fit air conditioning, mainly because I suffer badly from hay fever, and ravelling with the windows open in summers almost impossible.
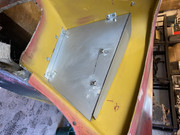
Using the most compact combined heating and AC unit I could find, it will just fit above the passenger foot well. I've modified the outlet plenum to accept some tight 90degree elbows to which I've bonded the 50mm flexible ducting to the dash and windscreen outlets. I can make the a/c connections from inside the car, but had to cut a 'hatch' in the wheel arch to access the heating and condense connections.


I'll need to fabricate a bracket to carry the compressor now. I've seen a video of a Marcos, with a pre crossflow, that had an a/c compressor mounted under the alternator, so at least it's been done before.
Now I can finish putting the parts of the inner wing back that had been cut out

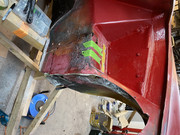
Looks like the gap has been quite hot in the past! need to get it properly bonded in and protected with some heat mat.
Another step towards being able to put the engine compartment under tray in. |
|
| Back to top |
|
|
|

