MAGAZINE
No 133 SPRING 2013
Edlines
Roger Coupe has now produced paperweights representing all Rochdale models and you can buy copies from him see picture on p30. These are miniature works of art.
No contributions to the Rating Cars page this time. I live in hope.
Hole
in the head
Derek mentions in his article that I had some difficulties when upgrading the cylinder head on my A-series-engined Phase 1. Quite. I did the usual David Vizard whizzo things to a spare head and then took it off to a family owned local engineering company to have unleaded valve inserts fitted. I had a call to ask me to come in and have a look, as it turned out that I had the one head in perhaps 20 to have a casting defect in a critical place, so the recess for one insert had broken into the waterway. Result scrap head. A rapid scan of eBay found another, sporting larger inlet valves, which I got at a very reasonable price. With my experience of the previous head work, plus a new die grinder with carbide burrs, I soon had this prepared, and this time the inserts went in OK. At the time of writing it is installed, together with high ratio rockers, new manifolds and a re-profiled needle in the SU carb (see story p15). It certainly feels livelier, but I have a rolling road session booked shortly which will expose the gory details.
TONY
STANTONS NEWS & EVENTS
North
Worcestershire Classic Car Meet
The Bowling Green Inn, Shaw Lane, Stoke Prior, Wychbold, Nr Bromsgrove, Worcs. B60 4BH.
From 12.00pm Sunday 17th March 2013
From 12.00pm Sunday 21st April 2013
From 7.30pm Monday 20th May 2013
From 7.30pm Monday 17th June 2013
West
Warwickshire Classic Car Meet
The Moat House Inn, Birmingham Road, Kings Coughton, Nr Alcester, Warks, B49 5QF.
From 11.00am Sunday 31st March 2013
From 7.30pm Thursday 25th April 2013
From 7.30pm Thursday 30th May 2013
From 7.30pm Thursday 27th June 2013
Stoneleigh
Kit Car Show Sunday 5th & Monday 6th May 2013
Just to let you know I have reserved stand Number 39D for all
HISTORIC SPECIALS AND CLASSIC KIT CARS built before 1973
at the N.A.C. Stoneleigh Park, Warwickshire Sunday 5th and Monday 6th of May 2013, from 9.30am till 5.30pm. (May Day Bank Holiday weekend).
All kit car drivers are admitted free of charge, passengers are £10.
You can camp on the site, tents and caravans, please contact the organisers office 01406
372600 for details and forms. http://www.grosvenorshows.co.uk/html/kit_car_shows.html
Come to the main vehicular entrance which is located on the B4113, the Coventry to Leamington Spa road (follow signs for clubs and exhibitors (do not go into the Public car parks). Post code CV8 2LZ.
PLEASE tell everybody you know with a suitable car and place details on websites if you can, let's have a good turnout of Rochdale cars.
Contact Tony Stanton tony-stanton@fsmail.net
SILVERSTONE CLASSIC on the 26th, 27th & 28th July 2013.
In conjunction with the F.S.C.C. we have secured a designated display area within the Historic Grand Prix circuit at this 3-day event, and we are seeking further club marque cars to join us on display during the weekend. www.silverstoneclassic.com
Featuring 22 races, 800+ competitors, and 600 of the most valuable race cars and motorcycles in the world. On top of the mouth-watering line-up of races lasting between 20minuites and 1hour each, starring the very best single-seater, GT and Touring Cars from the past 80 years, the entire infield will be packed with more than 4000 classic cars showcasing in excess of 50 famous marques. There will also be a period funfair, air displays, trade stalls, live music, barbecues and more than 30 hot air balloons are set to fire up for their traditional morning and evening fly-outs.
DUFFY and I have been to this fabulous event for the last 8 years and I think it is better than Goodwood. You can walk around the paddock and in the pit garages at any time, talk to the drivers, watch the mechanics working on the cars close-up.
To enter your club car in the FSCC/ROC display area please contact Tony Stanton tony-stanton@fsmail.net and I will issue the club reference number to quote when booking tickets and Marque car passes. So you get 2-4-1 (you buy 1 get 1 free + club car pass) for the best price on tickets, order before 31st March 2013.
(If anyone would like a price ticket for Friday, Saturday or Sunday please give me a ring)
* * * * * * *
* * * * * * * * * * * * *
Olympics and Owners from the past discovered.
Drag Racing Olympic
The photograph below appeared in an edition of Which Kit magazine in 2006 asking for any details. It's 1973

Looking at the partial registration, the Olympic database records show ULP 792F is a Olympic Phase 1, and the name Peter Brown, from Northholt, Middlesex. in around 1977.
The car was registered on the 17th June 1968 in Stanmore, London, which is a late date for a Phase 1 to be registered. In 2010 when James Farrington was living in the Northholt area I asked if he would call at the address, but it turned out to be a block of flats and the old lady there knew nothing about a Peter Brown. The trail now went cold, till surfing the web last August I came across a site called 'rodsnsods' and on the History Archive Forum a thread called '1970s pics from Santa Pod'
http://www.rodsnsods.co.uk/forum/history-archive/1970s-pics-santa-pod-19830/page53 (scroll down to pages 53, 54 and 55)
So I posted the above photo on the forum along with a message requesting did anyone know the Olympic and the name of the driver would be nice. There appears to be a few Drag Racing historians on this web site, one well known one called 'Timetravel' posted back that he was sure the photo was from 1973, as the Santa Pod startline gantry did not go up till 1972 and looking through his old 1973 programmes it's listed as run by R Brett, car is called Detonator and the engine is a BMC 1588cc.
I then cross-referenced Brett through the Olympic database and in the 500+ adverts for Olympics for sale or wanted stored in the database came up with the following: -
Exchange & Mart 3rd February 1972: -
Rochdale Olympic 1968, tuned Riley 1500, very fast, good condition, £600 or exchange for Lotus 7, any time. Brett, 12 Devonshire Road, Southall, Middx.
I know he did not sell the car at that time, because looking through the Santa Pod programmes Mr Brett raced the Olympic at least 35 times at Santa Pod between April 1969 and November 1973 (I do not have any programs for 1974). But so far no luck in tracing Mr Brett or ULP 792F.
As an aside to this story over the last 2 years I have been corresponding with Trevor Pyman who is the Ginetta Registrar. I had heard about Trevors knowledge for classic fibreglass kit cars many years ago, but only first met Trevor in person at the Stoneleigh Kit Car Show in 2010. Trevor over the years since a schoolboy has been collecting numbers, not train numbers but car numbers. But not only the numbers, he wrote down details of each car and when and where it was seen. He has over the last 6 months kindly spent a lot of time and effort writing the Olympic details down for me, which has led to a lot of new information for the Olympic database. Thank you Trevor on behalf of the ROC.
Below are the details on ULP 792F as seen by Trevor.
ULP 792F. I have seen this car twice. I'd been with my parents to my cousins wedding at Leamington Spa and returning home on a wet Sunday afternoon 13/9/1970 saw it parked in the M1 services at Toddington south bound. In May spring bank holiday 1972 I saw it running up the drag strip at Santa Pod. The photo you enclosed I believe was probably taken there. After I'd seen it at Santa Pod, I speculated that the day I saw it at Toddington it might have been on its way back to London (where it was registered) from Santa Pod, Toddington being the first services on route!
PS While I looking through the Santa Pod programs I also came across the following: - A Murkin Frantic Rochdale/Ford 1650cc September 1973 Any member know this car, is it an Olympic or a GT?
*
* * * * * LETTERS * * * * * *
From Roy McKnight
90% Complete
Just after Christmas I sold my MGTD and started looking for a new project, I had the green light from the wife and so the hunt began. I wanted something different and of limited production and preferably fiberglass. I bid on a few cars on Ebay but felt as they needed restoration they were just too expensive. Then 2 Olympics appeared on Ebay as classified adds. One was a PH2 in bits and the other a PH1 in bits, both about the same price. I liked the idea of the PH1 as it was Ford 1500 powered and as I have a MGA I didn't want another B powered car. So I spoke to the vendor and he said he had owned the car for 20 years, he had dismantled it for restoration but then left it. He also said it was 90% complete.
This intrigued me as I remember Malcolm Mckays column in one of the classic car magazines going way back. He ran an Olympic for many years and I followed his trials and tribulations monthly and it just seemed to come across as a fun car.
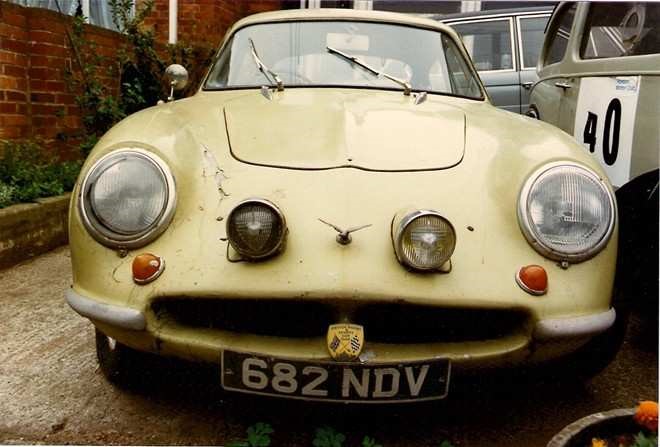
So a deal was struck for 682 NDV, a 1963 Olympic. It was in Exeter and in fact all the previous owners were all local to that area. So I agreed I would hire a van and come down that weekend to collect. I did a google search and checked the dimensions of an Olympic and hired a Luton bodied van; it would just fit in. Arranged for the Saturday, it snowed and snowed and snowed and although it was not too bad in Exeter we had in excess of 6 inches on the ground in Surrey, and in fact it was so bad my son could not even get to the van hire company on the Friday lunchtime. So we rung them and hoped we could get the van for the weekend after without losing our money. In fact, I think they were quite pleased as they were waiting for us as they wanted to go home.
So the next weekend with less snow but more ice we drove down to Exeter from Surrey and arrived to find the Rochdale sitting on the drive surrounded by parts. First impressions, very poor, lot of stuff missing and what was there was of poor quality but I suppose beggars can't be choosers as they say so I still bought it.
So what have I got? Well it's a PH1 powered by a Ford 1500 GT but with Morris 1000 brakes; was hoping it would have Riley Brakes. It had been out of the club's radar for about 20 years and was thought lost. It has a opening rear hatch, done quite well and looks factory apart from the locking mechanism which is 2 door handles. Part of its 20 yrs layup has been outside and it was full of leaves and the odd bird's nest under the dash. Its really just a rolling shell, everything on it needs going through, it's either missing, damaged or needing repair. The body is full of holes, extra dials and switches etc. Part of the transmission tunnel cut away, holes in the bulkhead etc . Yes its 90% complete but 50% of what's left is rubbish.
Right I am off to the garage. Message to the wife, I am going out - I may be a little while.
Roy
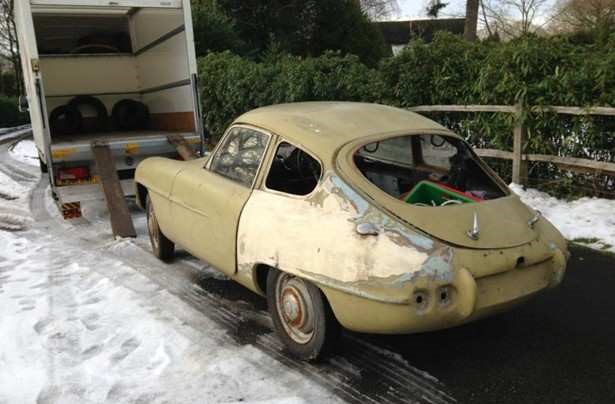
682 NDV in
Transit
From Alistair Banks
Dear All,
I'd like to introduce myself as a renewed club member with an Olympic. I think this has been my 3rd time of joining the club and feel that offering some kind of contribution to the Club magazine is long overdue. My car (TBF 966) may be known to some of you, but I have selfishly not shared any of the story with the Club.
Upon this time of joining I looked to source as many back issues of the club magazine as possible and have enjoyed reading through the first 100 magazines on PDF via the CD, and also physical copies of most magazines from 101 to date, fresh out of Alans loft. Firstly, I'd like to say that the magazine is a credit to the club, both it's members and the committee, especially the numerous Secretaries that have taken on that responsibility. I have really enjoyed reading through them and it makes me even more proud to be part of a small number of owners who are as equally smart/perverse to love these cars. So anyway, I thought I would just start off and fill in a few gaps about me and the story of how I acquired my car.
I first became interested in the Olympic after seeing a short listing and a grainy picture in a Classic and Sporstcar book, Classic Car Buyers Guide 1996-7. So, then, I would have been about 21. By that stage I had only owned 1 car, a Triumph Dolomite. A somewhat leftfield choice when others were interested in Fiestas and Novas. Even by that stage, I had started to become jaded by keeping rust at bay. I liked older cars but wasn't so keen on the way they dissolved. So, the idea of a fibreglass monocoque appealed. And the styling of the Olympic also seemed attractive. Anyway, I didn't take it any further, and I obviously didn't learn my lesson because my next car was a Sunbeam Rapier.
The next time my interest in the Olympic was sparked again, was the feature on Duffy and Richard Parker in Classic Cars magazine. Wow! What a car. I'm sure that feature has been the reason for much interest in the Olympic, and I am just one of those number, so nothing unusual there.
So, roll on a few years, an Olympic still feels like a dream for a later time in my life; when I have some more money, and ideally, when I am a little more skilled in car maintenance. Then, out of the blue, I was lucky enough for the taxman to realise he had been more than typically greedy and I got a rebate. Being young and with few commitments, the idea of a Rochdale suddenly seemed to have real potential. I made contact with Keith Hamer (I think maybe after joining through the Club, I forget).
Keith was friendly, knowledgeable and also only 20 minutes from where i grew up near Chester. Excitement got the better of me and we were soon talking specifically about 1 particular car that Keith had recently rescued TBF 966. This was early 2004. I visited Keiths workshop to view the car. In hindsight, this was certainly not a fact finding mission, or a well approached car inspection. I basically just went there, saw a workshop full of rare, interesting cars, thought it was cool, took some pictures (which I will scan and share for my next update) and let my heart rule my head. So, being naive, excited, and thinking that a few thousand pounds was sufficient to fund an Olympic project, I bought the car.
Like many owners I am guessing, I had never seen another on the road before, let alone driven, or ridden in one. That sort of thing didn't seem to be of concern to me back then. I wasn't bothered by the lack of a road test partly because the plans for the car from day one were far from standard spec if such a thing does exist for an Olympic! Partly inspired by Duffy, and also by what Keith was starting with another owners car, I wanted a modern powerplant that would mean a civilised, reliable and rapid road car. The Rover K series was the obvious choice (no sniggering at the back!). The engine choice turned out to be the first in a long run of different ideas for the car I'm never one to make life easy for myself!
So, that was 2004 and the start of a very long journey although having read some owners updates in the Magazine not as long as some. The car has managed to hit the road, in fact, it got its MOT back in 2011. Keith and I would both reflect that the car seemed to fight the rebuild every step. Keith had to fight the car hands on, I just watched from a distance, ill equipped with the skills or knowledge to progress myself. The car certainly hasn't been restored to period spec, and I'm sure for those of you that do know of it, you will have an opinion one way or other. I would ask that you do reserve judgement however, as the car is still changing, improving and maturing. In the interests of getting this update sent to Alan in time, I'll draw my introduction to a close here. I'll pick it up for the next magazine, and promise to get into some more interesting detail, and share some pictures.
Has my Olympic experience so far been interesting? Yes. Has it been more expensive and taken longer than anyone had imagined? Yes. Do people that know me think I am mad for the time and money that has gone into the car? On the most part, yes. Should I have bought one without being able to tackle the build myself? Probably not. Am I glad I did? Stupidly, yes.
To be continued....
Happy to be part of the Club
Alastair
Refurbishing
and Updating Rochdale Electrical Systems Electrical Distribution Systems
Howard Evans
This article covers electrical distribution systems (EDS) which, in the context of Rochdales, include only wiring system and fuseboxes. The EDS is the element of the electrical system which often causes the most trepidation to those contemplating the restoration of a vehicle, whereas it is actually one of the more straightforward aspects that can be tackled. The fundamental question is whether to restore the existing EDS, replace it with something contemporaneous with the vehicle build date, or create something that is designed to meet 21st century levels of performance.
Assessment
of What Exists
If an EDS is present, it will often evidence the history of the car with myriad modifications and updates. The presence of external taped splices, Scotchloks, corroded connectors, 'chocolate blocks' and damaged insulation are all signs suggesting caution!
A useful test is to strip back insulation several inches from a cable termination and examine the conductor. It should be bright or tinned copper. If it is black, this indicates that water has travelled along the cable by capillary action and electrolytic corrosion has occurred. This will be most obvious in cables which are permanently energised, such as those connected to the alternator, or dynamo control box. This condition can cause the splices, and even the terminals at the other end of the cable inside the car, to corrode with an associated increase in circuit resistance and voltage drop. If it is possible to power the system up with a charged battery, switch on the headlamps and check the voltage that is present at the bulbs. If it is significantly more than one volt below the battery voltage it is indicative of a possible EDS problem. Of course, anything can be repaired given sufficient time and effort, but if any of the above issues is present it is worth considering other options.
Replacement
with Proprietary Parts
Autosparks can provide a period style harness set for an Olympic for around £260. They also offer a customisation service for additional features, should they be required. These products will provide an authentic appearance and level of performance.
Building
New
There are 5 significant issues to be considered: cable sizing, splicing, fusing, connectors, and the use of relays.
Cable
Sizing
This is relatively straightforward. The appropriate cable cross section (XSA) is dependent upon the current to be carried and the voltage required at the load. Either empirical data or specific calculations can be used to select the XSA. Generally, the lowest volt drop gives the best performance but care should be taken with headlamp circuits. The light output of an incandescent bulb has an approximate cube relationship to the supply voltage, so the temptation is to achieve the highest voltage to get the best performance. However, the bulbs are designed to achieve their optimum life at a terminal voltage of between 12.8V to 13.2 V, and any higher value will decrease their operating life significantly.
The table below might be useful in selection cable sizes for specific currents: -
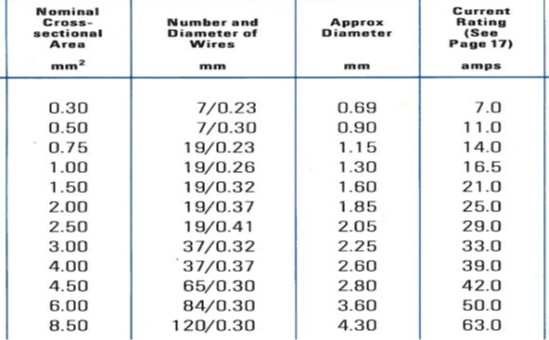
One issue not to be overlooked with GRP bodies is the need to include the resistance of the 'earth' cables in calculations. This would not be necessary on welded steel monocoques, where it is so low that it can be ignored.
Splicing
In times past, splices, formed by crimping a number of conductors together, were insulated using conventional PVC tape. This gave electrical and mechanical protection, but not against the ingress of water. Any such splices when located in a wet area, (just about everywhere on a Rochdale!), are potentially subject to corrosion. Soldering the crimped joint improves its integrity but the insulation needs to be applied by using glued-lined, dual wall (heatshrink) sleeves. The preferred brand is 'Raychem', a division of Tyco. These are placed over the joint and heated with a gun which causes them to 'recover' to their natural diameter, usually a third to a quarter of the supplied condition. Coincidently, the adhesive melts and forms a waterproof bond to the PVC, imparting a completely effective seal.
Fusing
The purpose of a fuse is to protect the 'downstream' cables from 'thermal events' (as is said in the trade), nothing more! Once this is understood, then choosing the appropriate fuse ratings to protect the wiring is relatively straightforward. With one exception, the current stamped on the fuse is its carrying current that which it can pass indefinitely without blowing. (The exception is a very old style of Lucas glass cartridge fuse that can be recognised by a coloured paper insert with a rating printed on it, and the fuse wire being externally soldered to the metal end caps. The rating on these is the 'blow' current.)
As the fuse can only protect the downstream cable, it should be placed as close to the power source (battery or generator) as possible.
The fuse blow mechanism is the melting of the metal fuse element, and the time taken to clear is proportional to the power dissipated: the so-called I2t rating. This is important when considering two of the factors influencing the choice of fuse value: -
The 135% factor A fuse may not blow when passing up to 135% of its nominal rating, and even the more controlled designs (see below) specify up to 1 hour at 135% of nominal. This means that, for example, a cable protected by a 10A fuse must be able to withstand 13.5A continuously in order to guarantee adequate protection.
The second is the mechanical failure of the fuse element resulting from thermal cycling when currents are switched on and off. This causes metal fatigue which can lead to 'nuisance' blowing: -
The 75% factor in order to eliminate the risk of nuisance blows it is important to limit the steady-state or inrush currents carried by the fuse to around 75% of its nominal rating.
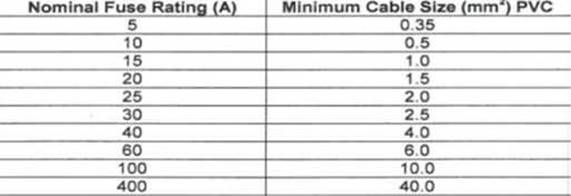 The
table below shows the minimum cable XSA that can be protected by a range of
common fuse ratings:-
The
table below shows the minimum cable XSA that can be protected by a range of
common fuse ratings:-
Fuse
Allocation
In the late 1950s/early 60s it was not at all unusual for vehicles to have no fuses, and typically only 2 or 3. The consequence of this was that when failures occurred, there was a significant loss of functionality. The integrity of electrical system can be improved dramatically through the use of additional fuses to limit the consequences of a fuse blow.
When designing a new EDS, particular attention should be paid to exterior lighting. For example, individual fuses for the left and right sidelights plus each main and dip filament (6 in total), give the reassurance that a single point failure will not cause a total loss of illumination at either the side, front or rear of the car.
Similarly, it is recommended that the fuse protecting the ignition system wiring should not be shared with any other circuit to avoid an otherwise trivial fault immobilising the vehicle.
A further benefit of multiple fusing is that it facilitates cable size optimisation. For example, if all external lighting is fed from a single fuse of, say, 20A rating, then all cables protected by the fuse, including the feed to the main beam warning light, should be of a cross section capable of being protected by that fuse, e.g. 1.5 square mm XSA. If the 6 fuses suggested above were used, then the headlight circuits could be reduced to 0.5 sq mm cables and the sidelights and warning light to 0.35 sq mm. The fuses would be 4x7.5A and 2x3A for head and side lights respectively.
Fuse
Type
The recommended fuse family is the ATO range from Littel. As well as having the most controlled electrical parameters, they have the advantage that the terminals and element are produced from a single piece of metal strip, so eliminating internal connections and improving reliability. A range of fuseboxes is available from suppliers such as MTA, designed to accommodate Littelfuses.
Connectors
Most of the original equipment fitted to Rochdales has 'Lucar' or 'bullet' type connectors. These afford little opportunity for waterproofing, and they provide entry points for water ingress into the cables. From here it can travel throughout the harness (sometime I will tell the story of how certain Bentley rear light units became filled with coolant!) by capillary action through the interstices between the cable strands. Soldering the crimp and applying glue lined heatshrink over the crimp area is effective, but care must be taken to avoid the glue contaminating the contact faces.
If considering the crimp-only application of terminals and splices, it is worth investing in a crimping tool that has specific profiles for each cable/teminal combination. The cheaper 'universal' type that simply squeezes the crimpform closed is unable to produce the void-free compaction of the copper conductors which is essential for a reliable joint.
Relays
Relays are effectively 'amplifiers' enabling a large load current of tens of amps to be controlled by a coil current of milliamps. In addition, they allow the switching to be made adjacent to the power source and loads, so minimising the required length of high current wiring.
On Rochdales, the majority of the high current requirement is underbonnet headlamps, horns, and cooling fan. MTA manufactures a relay box which houses 4 off ISO Mini relays and which also clips to the 16-way fusebox mentioned previously. Together they enable a compact integrated unit to be used, mounted close to the battery or alternator as shown below.

Summary
Refurbishing a wiring system or building new is entirely feasible as a part of a vehicle upgrade/restoration project, and it is hoped that the information detailed above will be of assistance to anyone contemplating such an activity.
Wipers,
Die grinders & SU needles
Alan Farrer
Wiper
blades
I have found the black 11" long x 7mm wide ones (for Mini) from Old Skool Classic Cars at £3.70 excellent, though you will need the 7mm wide arms to go with them (MGB GT are 13" long and just about suited to an Olympic). Avoid the new 5mm wide Tex (eg on eBay) they only smear.
Die
Grinders
I have done some cylinder head mods over the years, the first using my father-in-laws old Wolf electric drill. This managed my feeble efforts on a Mini head back in the early 60s before expiring. Some 30 years later, when I rebuilt my first Phase 1 I did extensive work on the Wolseley1500 cylinder head using first a normal electric drill with shank grindstones and then the well-known Dremel with 1/8" shank grindstones. I was a bit disappointed with this much vaunted equipment as it had very poor speed control and conked out after a while, a fate that befell its replacement.
The Dremel replacement, a mini drill I bought from Halfords, was much better and served until recently, when I came to work on the A-series head on my current Phase 1(Kermit). The problem with the usual drills is the difficulty in reaching inside the small ports and round the bends, as there is not enough reach on the shaft, but the port is too narrow to insert the drill body. I was reluctant to use an air powered die grinder as it needs a noisy compressor working continuously.
Salvation came in the form of a Proxxon mains powered long reach die grinder. This is about as good as you can get for this type of kit, as it is plenty powerful, its speed control is excellent (6000 - 18000 rpm), it comes with a range of high precision collets, it is very quiet and it has an extended nose 70mm long. This long nose has several benefits: it reaches well inside the ports, it supports the shaft well so leads to long life, it allows a better grip for greater precision, and it keeps the grit from grinding well away from the cooling fan so it doesn't get blown all over the place and doesn't get drawn into the tool. I wish I had come across this earlier.
In the past I have used mounted stones when head grinding cast iron, but when I found a Hong Kong company selling tungsten carbide burr sets for pocket money I thought it was worth the risk. The burrs came quickly and work perfectly, so no problems at all, and they remove metal very quickly. The only problem is a general one concerned with the way the cutting flutes are formed with burrs. They have a clockwise spiral form (like a twist drill); this is presumably to direct the chaff away from the cutting area, but it means there is a tendency to pull the bit out of the collet when subjected to the high vibration levels that occur in use. No big problem, but one needs to keep an eye on it.
SU
needle profiles
The SU carburettor is an amazing piece of equipment, being both simple in design but versatile. It hardly changed in basic design for nearly a century. Most of us who have had BMC cars are very familiar with its characteristic shape, dominated by that dashpot. When you have a standard car there is usually no need to do more than top up the oil in the dashpot, but when you have a modified engine, or use one on an engine not originally designed for one, there comes the thorny problem of selecting a needle. Until the age of the internet with its blogs and forums, you had two choices: trial and error or go to a tuning establishment.
Reading the opinions on various forums there is a general consensus that the piston should reach maximum height at maximum power in that way the needle profile can give the correct fuelling at all throttle openings. However, I saw when I used a 44mm SU on a 1600cc Toyota engine, that it reached full opening long before that, and the same happened even on my latest 1275cc engine in a standard state of tune. Also the same size of carb is used on engines varying from 1.0 to 1.6 litres and beyond, whose demand for air is widely different. Different springs are used to compensate to some extent, but their use is not very common, so what is going on?
I think I know the answer, but I have never seen it mentioned. I think that the variable choke part is used for light to medium throttle openings to give good fuel atomisation and thus good drivability, but when the piston is at maximum height the carb works in fixed choke mode. It still sucks in more fuel as the airflow increases due to the usual venturi effect, just like a Weber for example, but it doesn't have to cater for low throttle conditions as well. This makes its operation much more controllable over a wide power range and this is its great strength. My realisation came about in stages.
When I first got the engine running using the standard needle it refused to accelerate at all and only by using a much richer needle was there any power. Even then the power dropped off rapidly at higher revs, causing a misfire and dramatic loss of power. I found that the piston reached maximum lift even when opening the throttle wide by hand in neutral, so well below maximum power. I tried a stronger spring to no good effect, so I took it to have a rolling road session at a place well acquainted with A-series engines run by Neil, the son of an ex Downton Engineering man Bryan Slark.
With the needle I had fitted it produced 52 BHP at just 4100rpm and the power fell away rapidly, just as it felt on the road. With Neils second choice power increased to 56 BHP at 4400rpm, better but still well under par. He then tried a needle he found had worked well on many occasions and power leapt up to 64BHP at 5300rpm and this is where we left it, as in normal running I rarely exceed 5000rpm. By checking in the profile chart later I found this needle was slightly richer at medium lift but 30% richer at maximum lift than the first needle I had tried (the intermediate needle was 10% richer). This seemed a lot, but as the mixture was monitored constantly during the rolling road run and found to be correct, there is no doubt that this not excessively rich.
The next stage came when I fitted a gasflowed head, high lift rockers and better manifolds. The engine certainly felt livelier, but it suddenly misfired at 6000rpm, which I initially put down to valve bounce, as I has used some original valve springs which I thought might have softened a bit. Remembering what a richer needle had done previously, I re-profiled a spare needle to be about 10% weaker at low lift than that already installed, about the same profile over the middle-upper range but another 10% richer at the very top the last 2 stations (1/4"). With this fitted the engine revved out to more than 6000rpm with ease, with a smooth delivery of torque all the way up, so another rolling road session has been booked to see what it achieves.
These results show that there is no need for the piston to reach maximum lift only at maximum power; what is important is that when it does so the profile at this lift is adequate to supply the required fuel. Maybe I should add that I calculated fuel flow as proportional to the area of the annulus between needle and jet (I used Microsoft Excel to make the calculations). A refinement was to average the needle dimensions at 3 stations (positions on the needle spaced by 1/8", the first one as it enters the jet and the two further in) to make the calculation, since the jet has a depth of so the flow is restricted through an annulus.
It's all good clean fun.
279
CWD Ramblings
This is a Phase 1 I put back on the road in April 2012 after an absence of 30+ years. It started life with the usual Riley motor, but as that had disappeared by the time it came into my hands I fitted a 1275 A-series engine. In my view this is a distinct improvement, as a modestly tuned 1275 will produce the same power as the original Riley 1.5 (though probably less torque) and loses about 100kg in weight including the gearbox. As this weight is all at the front the steering can't help but be lighter and more responsive.
I decided to minimise the weight wherever possible, on the basis that adding lightness equates to adding performance, a la Lotus. So it was Minor 8" drums instead of the beefy Riley 9" and also a Reliant Robin axle to go with the A-series engine/gearbox. This axle has two benefits: it saves about 10kg relative to the Riley item and has a high ratio differential which means no overdrive or 5-speed gearbox conversion is necessary, so the A-series gearbox, which weighs only 20 kg, is fine. Top gives over 20mph/1000rpm and this high top gear means relaxed motorway cruising.
I have found that using a Midget gearbox the ratios are all usable (although 1st and 2nd are a bit too high so a Minor box would be better), whereas with a 1.8 MGB engine (the usual replacement for the Riley) 1st gear is redundant but 2nd is a bit too high as a starting gear. I have been pleasantly surprised by the way the car drives. Even with an engine in a standard state of tune (64BHP) the car had plenty of go and certainly did not struggle on motorway inclines. The steering is particularly satisfying, being both light and accurate, with no kickback and with just a trace of understeer it remains stable even on poor roads.
As usual with me the suspension has come in for a bit of attention. The back axle is located with upper and lower arms both sides and a Panhard rod set a little above the axle. The car initially had a pair of old Spax dampers fitted with standard 90lb springs kindly loaned by Derek, but this setup has now been replaced by new Spax CSX dampers and 80lb x 14" x 2.25" springs from Faulkener. As Faulkener are close to me I collected them. Their small warehouse (shed) is crammed with thousands of springs for off the shelf delivery and they can do specials at very reasonable prices too. One of the problems with this car is that the right hand spring needs to be set 10mm higher than the left to balance the car side to side, so a damper height-adjustment is necessary. In this way I can not only set the ride height to a suitable level but also equalise the corner weights. I chose the CSX dampers as they did wonders for my Phase 2 I could not get a satisfactory ride with the Gaz and AVO I had previously fitted.
With this car the front suspension is too stiff due to its low front axle load. I am trying to soften the springs (torsion bars) by getting a spare pair of bars turned down, but in the meantime I have just softened the damping using the information given in Magazine No 73 Spring 1998. When I took out the damping valves I found one was normal, but the other had no bleed orifice and strong blow-off springs hence the bone hard ride I initially found. By means of trial (and error) I found a setting which gave reasonable damping at least until the spring rates have been reduced.
With this setup the ride is pretty good, helped by good seats (from an MX5 and finished in leather, my only concession to minimising weight). It rides poor roads very well (plenty of practice around these parts) and the car is surprisingly quiet, even when it had no interior soundproofing. All in all very nice.
Postscript Feb 2013: Front brakes are now disc and I have just fitted a modified head (a DIY job by me), high ratio rockers and an improved exhaust, which gives the expected improvement in performance; a trip to the rolling road is planned. Alan Farrer
THE SPILLER FAMILY CARS IN
PICTURES
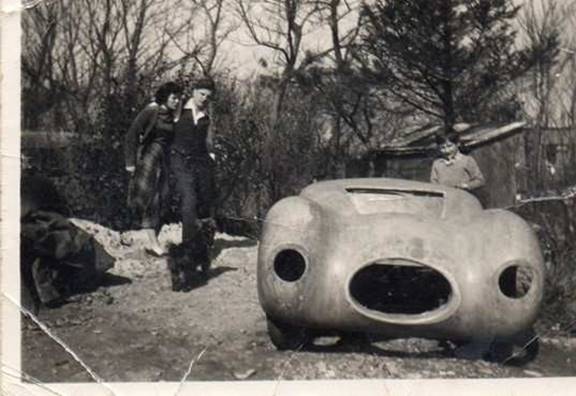 Paul
Spiller
Paul
Spiller
This photos is of Mum and Dad [Dave Spiller member] with Mums nephew in 1954 with the Mark V1 bodyshell Reg WCV 816 colour polymatic blue.

The front of the chassis and
Another photo of my Grandad Harry Moore with this car appeared in magazine No 82, Cornish Odyssey and there was a write up about our cars in magazine No 121.
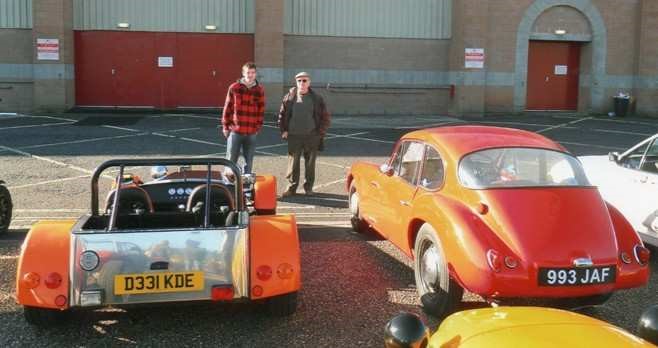
993 JAF at the Haynes museum Rare Breeds Show 2010.

Exeter kit car show 2010, with dad and my son James' GBS ZERO, which we built together, so two cars built by four generations of one family.
Calibrating
a Speedometer
Alan Farrer
I have recently put a Phase 1 back on the road after a lapse of maybe 30 years and have now completed over 3000 miles. On a recent trip I used a satnav to check the calibration of the speedo and found it was grossly over-reading about 80 mph at a true 70 mph. These are usually perhaps 5% optimistic, but 14%? This was doubly curious because the car has a 15% higher ratio back axle than standard. I also wanted to check the calibration of the odometer, so an investigation was called for.
Speedometers work by magnetic induction/drag: the cable drives a flat magnet and the needle is connected to an aluminium drum spaced 2-3 mm from the magnet. As the magnet turns it drags the wheel after it until the drag is balanced by a hairspring. The calibration is set by the strength of the magnet (pretty standard I would expect), the spacing, and the strength of the hairspring. The only factor that it is practicable to adjust, unless you have clockmaking expertise, is the spacing. That looked difficult and I did not want to damage my only instrument, so I resigned myself to making do with it until I could find a more suitable instrument.
A speedometer can be calibrated against its odometer using an electric drill and a stopwatch as follows: Connect the drill to the speedo using a spare cable and clamp both to the bench. Set the drill in reverse (anticlockwise) to a speed between 500 and 1000 rpm. Take a note of the indicated speed (usually 30-60 mph) and measure the time taken to cover 1 mile on the trip meter (which has tenths). Divide this time (in seconds) into 3600 to give true speed. I did this with mine and found the speedo over-read by 6-10% depending on the speed. At 70 mph the error was +6%.
I calibrated the odometer as follows: I unscrewed the speedo cable from the speedo, fitted a card pointer to the end of the speedo cable and jacked up a rear wheel. I marked the tyre, turned it 20 turns and noted the number of turns made by the speedo cable pointer. In my case this was 12.4. 20 turns is used as this corresponds to 10 turns if both wheels turn, so the nett ratio is 1.24:1. I know my diff ratio is 3.22, so the ratio between the propshaft (ie engine in direct drive top gear) and speedo cable is 3.22/1.24 = 2.60:1. This is the reduction gear ratio in the gearbox.
In 1 hour at 1000 rpm my engine will turn 60,000 times and in top gear my car will then cover 20.78 miles. I know this from calculation (it also agrees with the published gearing of the original Phase 1 on the same size tyres and adjusted by the diff ratios). The speedo cable will therefore make 60,000/2.60 = 23,077 turns. The speedo is geared at 1020 revs per mile (shown in small print on the dial), so 23,077 turns equates to 23,077/1020 = 22.62 miles. The true distance is 20.78 miles, so the instrument error is +8.8%. This probably arises because the speedo was from a Wolseley 1500 and I am using an MG Midget gearbox which I assume has a different speedo reduction gear ratio.
Summary:
Basic odometer error due to different gearbox = +8.8% Speedo calibration error ~ +6% at 70 mph.
Total speed error at 70mph ~15% (in surprisingly good agreement with the on-road observation).
Conclusion: To get an accurate mile and speed indicator I will need a well calibrated speedometer geared at 1110 turns/mile. Do they exist?
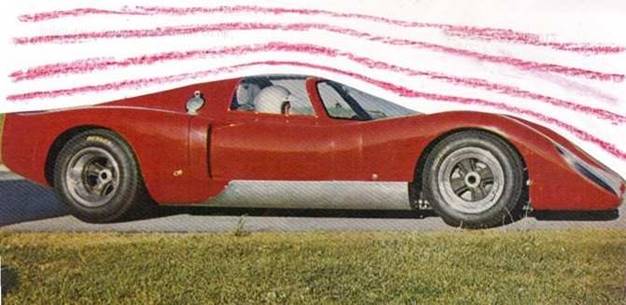
Car
aerodynamics in focus
Derek Argyle
The top speed of any vehicle is governed by many factors. Firstly, there is the amount of power that the engine develops to consider, the gearing, the shape of the body, the drive-line losses, the drag from the tyres, the friction of the bearings throughout the car and even the viscosity of the oils being used. In the case of the engine, there are many pumping losses. Vast quantities of air are circulating within the crankcase as the crank rotates and pistons move up and down. Power loss occurs with the friction within the bores and with the engine driving the alternator, water and oil pumps that propel liquids around the engines internals. In the case of the tyres the 'sticky' type, as used in racing, add considerably more drag as do under-inflated ones.
Before the 20th century it was quite something just to get a car to roll along but years later it was realised that advantages could be made to a cars speed and economy if its bodywork could become streamlined. We see a move in the right direction with the record-breaking car 'Le Jamais Content' which had a long thin sausage-like body pointed at both ends. Long before its time the Czech Tatra T77 of 1934, which was tested in a wind tunnel, achieved an outstanding Cd value of 0.22 when one considers the year of its conception. American car designers acknowledged the need to 'cheat-the-wind' and produced cars such as the Chrysler Airflow model.
Little can be done about engine and drive-line friction in the quest for speed but the drag from a cars bodywork can be reduced to a great extent with attention to its shape and detail. For example, windows benefit from being fitted flush with the bodywork and wheel-arches that are close-fitting to the outer edge of tyres all aid aerodynamic efficiency as do wheel spats. A great stride forward occurred when individual headlights became a part of the wings.
Such necessary items as radiators and grills add considerably more drag, particularly where there are little or no direct outlets along the sides or top of the cars tail. Incoming air will build up in the engine bay to act like a brake. For cooling, a rear-engined car will require some form of scoops, that would adversely affect the smooth-flow of air along the body. Disc pads cause drag because they must always be in contact with the disc otherwise there would be play in the brake pedal. Most enthusiasts will have heard of the Kamm tail. Ideally for the least drag, the rear of a car would taper to a point. Obviously this would be impracticable. Dr Kamms experiments showed that if a cars tapering tail was cut off vertically at a point that gave approximately half the maximum cross-sectional area of the car, the airflow would leave the tails edges cleanly, so reducing drag noticeably.
Another area for consideration with regard to airflow efficiency is the underside of a car where there are numerous projections, suspension components and the exhaust system, all together a mess that badly interferes with smooth airflow. If panelling, ideally readily removable, but, at the same time maintaining ample ground clearance, were to be fitted to the underside of a car there would be greatly improved flow characteristics. Think of the great speed achieved by the XK120 on the Jabbeke highway that featured such aerodynamic appendages. A car in front elevation will have tyres that offer a certain wind resistance. Should the car be lowered there will be less resistance as the vehicle will now have a smaller frontal area.
Air that detaches from a body outline will induce drag so every attempt must be made by the designer to smooth out the lines of the bodywork where it changes from one section of the body to another. Additional drag can be measured from such small items as projecting door handles, mirrors, non-retracting aerials and external hinges. Most modern cars have developed into a shape that has a low Coefficient of Drag but still retain a necessary degree of practicality. This factor is in the order of 0.30 - 0.35. Cars such as Lotus/Caterham 7's have great accelerative ability due to their high power/weight ratio but being so slab-sided lose out in trying to achieve a high top speed hence, all things being equal, it would always be advisable to go for an all-enveloping body.
Some typical Coefficient of Drag values may be of interest.
Formula 1 car 0.7-1.1 (dependent on downforce setting)
Caterham/Lotus 7 0.70
Hummer 0.57
Citroen 2CV 0.51
Rover Mini 0.48
Lancia Aprilia 1937 0.47
Triumph Spitfire 0.42
Peugeot 405 1987 0.31
Lexus IS 2006 0.28
Audi A2 2003 0.27
Mercedes-Benz E class 2002 0.26
Honda Insight 2000 0.25
General Motors EV1 0.195
To conclude, when it comes to seeking a high top speed, it is much more than tuning for additional horsepower but as much for reducing resistance. As speed increases and the opposing drag factor becomes equal to the power available, then this sets the top speed of the car.
BIGGER
IS BETTER
Derek Argyle
Just as bust enlargement nowadays is common-place, so the installation of larger capacity engines into the cars of enthusiasts is a popular and rewarding pastime. But we should never forget that an improved power/weight ratio must, in the majority of cases, include an upgrade of the braking system and, with more power, a car can benefit from higher final drive gearing which, in turn, may maintain the original fuel economy.
Looking back, I recall that of the many cars I've owned, nearly half have had their engines tuned or replaced for ones of a greater capacity. Even going back to the motorcycling days, my 250cc Greeves scrambler underwent a change to a 500cc Triumph twin engine that gave me effortless pulling-power from low revs and a more pleasant ride.
The first car I owned that was modified was a charming little 1955 Standard 8 which, as pleasant as it was, lacked pace and acceleration. At the time these Standards were considered the poor man's Morris 1000 and it was through a motoring magazine advert that offered tuning for such cars that I approached a retired ex Police mechanic who was offering reasonably priced tuning from his North London premises. I suggested that if he could tune a Morris he must be able to tune a Standard. Soon a deal was done that consisted of the inevitable head skim, stronger valve springs, porting and larger carb. The extra performance made all the difference to the car but it felt even better after the suspension was later stiffened.
I bought and rebuilt a Mk2 GT6 that had been used for driving round a farmers field but though the car gave a reasonably spirited performance I was not satisfied, I wanted a little more. This came in the form of a 2.5 litre version of the GT6's original 2 litre engine and had been taken from a Triumph saloon. Unaware of its condition and to make certain that I would not have future problems I rebuilt it and made simple tuning improvements at the same time. The size and weight of a six cylinder engine that fitted into what was basically a Spitfire 4 cylinder chassis had never added anything to the handling of a GT6, and in moving to a larger engine of similar weight did not change the handling. A battery in the boot and a fuel tank generally kept above half full added balance and helped a lot with the cars handling.
I have written in the past about the Mini I bought for £5 (not a misprint) and which I finally discarded for another that cost a whopping £35. (You can buy too cheaply you know). From the two cars I had but one engine, an 850 that was running but totally knackered. As work progressed on rebuilding the better car, I found in the Trader magazine a local chap offering a converted 1100 A series engine that had been bored and fitted with Imp pistons which brought the capacity up to 1220 cc. This was more than I ever could have wished for especially with the price at which it was being offered and, after I removed the head to see the state of the internals, I was left quite speechless. The block face had been skimmed at an angle from the first cylinder across to the fourth. Oh dear, should I return the engine and demand my money back? The 1220 cc capacity was so tempting I had to find a way. I decided that if the block was angled, so the head could be as well and the Fleet motor engineers did a fine job of an angled head skim to match the angled block face. I think I remember that the compression ratio had gone up to over 10 to1 but fortunately this never gave me a pre-ignition problem. With a 731 cam added and later a 3.44 crown wheel & pinion this Mini became an incredibly torquey car to drive and was quite happy to pull two trials bikes on my home-built trailer.
When I bought an engine-less crashed 1969 Elan +2 for just £180 I had to decide how I would tackle the rebuild; there was not a lot of the car left. I decided to replace the chassis with a major section of the popular Spyder chassis (from bulkhead backwards) to which I would fabricate and attach a similar but longer chassis front end. The reason for this was that I would use the currently installed 2.5 engine from the GT6 and put back the old original 2 litre. With very little of the fibreglass front end remaining after the car had been on fire after the crash, I then had to fabricate a new front end. Already equipped with the four wheel discs, I added a decent set of wheels/tyres and gave the car a nice spray job in Jaguar Indigo blue. I now had a good looking, long-legged effortless tourer that was a better car than the original that had relied on just1558cc, even if it was a twin cam.
When the Elan +2 was finally sold, I bought a 240Z Datsun. It had less than satisfactory bodywork but I'm sure I was highly influenced by the pace of the car that was being demonstrated for me by a chap who could really drive and wanted a quick sale as he was about to emigrate. The car certainly flew but after 2-3 years of frustration with my ineffective fight against rust, I sold the car to a garage for it to be 'converted' into a fibreglass-bodied 250GTO Ferrari! Some while later, still loving the feel of and missing the 240Z, I was about to consider buying a Scimitar when I found a totally rebuilt 260Z that was absolutely rust-free and being sold at a fair price, no doubt because of a misfire that proved to be a low fuel level in one of the carbs. I believed that the extra capacity would possibly give me more performance but I was wrong. This bigger engine didn't rev like the 240 but did give a more relaxed drive. In all probability I think that 240 engine had probably had some engine tuning and the Swindon Racing Engines sticker on the bulkhead was not there just for show.
Because of eye problems when driving the open Wildcat roadster I had built, before selling it I built a fixed head coupe version known as the E Special which I still own and which took me three years to build from scratch. It was put on the road in 1997 but by about 2006 I had a strong desire for more performance from the 3.5 litre Rover V8. Further tuning of this engine would invariably lose bottom end power, something this engine was noted for, and most probably increase fuel consumption whereas an engine of greater capacity would retain torque even with a 'sports specification' tune by professionals. I bought an ex Land Rover Discovery 3.9 V8 engine that came from a one-owner car. On stripping it I was impressed at the cleanliness and general condition of the internals; it must have been regularly serviced.
I checked the tuning firm J.E. Engineering by making a visit to their premises near Coventry and, being most impressed at the thoroughness and standard of their work, later took the engine parts to them for detailed tuning. They did a superb job and it was a delight for me to put the engine back together. After all the work on building this car the increase in performance really was the icing on the cake; I love it.
I think that many of the older classic cars can benefit from a little engine upgrading to give the driver a more relaxed and pleasing drive. Even a simple head skim to raise what at the time would have been engines with a relatively low compression ratio and the addition of a better profile camshaft would work wonders. I know many friends who say they are quite happy with their classic or kitcar and wouldn't want to have their engine tuned. It's a different story when they try a car with a similar engine that has been tuned.
Derek Argyle
FBHVC
NEWS
EU
PROPOSALS ON ROADWORTHINESS TESTING
As everyone is aware, the EU Commission has produced a draft Regulation (COM (2012) 380) on periodic roadworthiness tests for motor vehicles. There has been much comment in the media on the subject, not all of it well-balanced or accurate, and much based upon a misunderstanding of the workings of the EU. In fact, within the EU, the work of examining the draft is only really beginning now.
On 17 October, the House of Commons European Scrutiny Committee considered the implications of the proposal. The position of historic vehicles was not mentioned directly but the report of that meeting makes it clear that the UK government opposes the proposed Regulation on the fundamental grounds that it breaches EU 'subsidiarity' principles because it would place a significant financial and regulatory burden on Member States while doing little for road safety. Put simply, the UK government believes the proposal to be out of proportion.
Ed more follows, but the point is that these are early days so what eventually happens to affect the Historic Vehicle movement will not happen for some time, and then only after much input from the FBHVC.
FUEL
NEWS
Matthew Vincent
The legislative process to permit the introduction of petrol containing up to 10% ethanol is expected to be completed by very late 2012 or early 2013. Once the enabling legislation is in place, the product, which will bear the name E10, may be sold at petrol stations, but unlike petrol containing 5% ethanol, which is already on sale, and which carries no label, E10 must be labelled. There has been recent publicity suggesting that there will be no introduction of the E10 petrol until
2014 or 2015. This may prove to be the case, and it would be situation which naturally the Federation would welcome. However, once the law permits the sale of this product, it must be recognised that it may appear in the market place. There may be retailers who wish to sell this fuel sooner rather than later. The Federation has been keen to ensure that when E10 petrol does appear at the pumps, it can be easily recognised for what it is, enabling the historic vehicle owner to make an informed choice over whether or not to purchase the product.
The higher octane petrol blend usually known as Super Premium contains much reduced levels of ethanol as a general rule, so this may be worth considering for those owners of historic vehicles who are concerned about possible adverse effects from ethanol addition to normal 95 octane unleaded petrol. Oil industry sources indicate that the Super Premium product, which must by law provide an octane quality of 97, but which may in fact exceed 99 octane, is blended to meet these quality levels without the addition of ethanol. In many cases no ethanol is blended into this product after it is transported from the refinery, although this is not always the case, making it very difficult to be precise about ethanol contents. Oil company producers do not always have close control over distribution terminals which is where ethanol is blended into petrol before sale at garage forecourts. However, on balance, purchasing a Super Premium blend of unleaded petrol provides the opportunity to minimise ethanol content.
Historic
Vehicle MoT Exemptions
The Statutory Instrument introducing the MoT exemption was published in October and came in to force on 18 November. SI 2012/2652 The Motor Vehicles (Tests) (Amendment) (No 2) Regulations 2012 simply adds pre-1960 vehicles to the list of other types of vehicle that do not require an MoT in order to be used on the road. We understand that a final decision about exemptions has not yet been made for Northern Ireland, which was the subject of a separate consultation.
The Road Traffic Act indicates that: the date of manufacture of a vehicle shall be taken to be the last day of the year during which its final assembly is completed except where after that day modifications are made to the vehicle before it is sold or supplied by retail and in that excepted case shall be taken to be the last day of the year during which the modifications are completed.
The Federation's response to the original MoT consultation, backed up by the completion of the on-line survey, deliberately included the option of voluntary tests something which had originally been opposed by DfT. The voluntary test will be the same as the statutory test with all the component and performance exemptions as allowed at present and there is thus no need to reinvent the wheel the test is there and will remain in the VOSA manual. The vehicle testing station can log it onto the system and carry out the test as normal. As in any case where a vehicle fails its test, whether voluntary or mandatory, the keeper has a responsibility to ensure they do not use that vehicle on a public road as it is not in a roadworthy condition.
To enable members to find a suitable testing station the Federation has carried a list of garages known to be sympathetic to our vehicles on the website for some considerable time. There are approximately 400 testers listed, all recommended by historic vehicle owners.
The situation regarding those circumstances where an MoT was required, for example, as part of the V765 procedure, was clarified at a meeting with DVLA in Swansea in September. An MoT will not be required apart from for the cherished number transfer process, which is subject to a different regulation. DVLA have announced that form V112, Declaration of Exemption from MoT Testing, will be amended to add a new category 'O' to the list of exempt vehicles manufactured before 1 January 1960. This completed form will be required in place of the MoT certificate.
The Federation has suggested that it would be in the interests of safety to require an MoT for any vehicle that has been off road and/or subject to a SORN declaration for more than three years and is about to be used on the road again. This would prevent, for example, a vehicle that was taken off the road because of a previous MoT failure coming back into use with no checks on roadworthiness. We have not had an answer to this suggestion at the time of writing.
A footnote for owners of all vehicles irrespective of age: an MoT test certificate issued after 18 November 2012 will now show the vehicles recent mileage history. This has been introduced as part of a government initiative to reduce vehicle crime. Where available, the mileage history will comprise the readings associated with the three most recent VT20s (test passes) along with the dates of those readings. This will be in addition to the mileage recorded at the time of the current test.
I am indebted to David Davies of the FBHVC in his Club News column for the following - Ed
The magazine of the register of Unusual Microcars 'Rumcar News' comments on the Omega engine designed by the notorious Granville Bradshaw in or around 1955. Having only nine moving parts yet being an eight-piston unit embodying not only two- stroke and four-stroke principles but turbine characteristics as well, the claim that it was radical design departure seems to be an understatement. Does anyone have any further details?
The Chester Vintage Enthusiasts Club newsletter contains the results of some in-depth research into Shakespearian connections with motoring; the results are interesting ...
Difficulty in starting engines:
'Which, much enforced, shows a hasty spark, and straight is cold again' Julius Caesar.
Over oiling engines:
'The rankest compound of villainous smell that ever offended nostril' Merry Wives of Windsor
Describing a mechanic:
'Another lean unwashed artificer!' King John.
Advertisements for petrol:
'A rarer spirit never did steer humanity!' Anthony and Cleopatra
About a traffic jam:
'Why, one that rode to his execution could never go so slow!' Cymbeline
Concerning a policeman on traffic control:
'Look - with what courteous action it waves you on!' Hamlet
And finally, tyre trouble:
'Let me not burst' Macbeth
I have a weakness for these apocryphal lists; this one appeared in the Crash Box and Classic Club magazine and is a selection of logged maintenance complaints by QANTAS pilots and the corrective action recorded by the mechanics.
P - Left inside main tyre almost needs replacement S - Almost replaced left inside main tyre.
P - Test flight OK except 'autoland' very rough S - 'Autoland' not installed on this aircraft
P - Something loose in cockpit
S - Something tightened in cockpit
P - Dead Bugs on windshield S - Live bugs on backorder
P - Autopilot in altitude-hold mode produces a 200 fpm descent S - Cannot reproduce problem on ground
P - Evidence of leak on right main landing gear S - Evidence removed.
EARLY
ROCHDALES
Firstly, apologies are in order. As I am in the middle of a move from Cyprus back to the UK I won't be able to catch up on the Early Rochdale related leads required to fill this section of the magazine. My house, family and life, which includes the computer gets shipped a good few weeks before you'll be reading this so I am unable to provide much info this quarter on the Early Rochdale scene. What I do have though is as follows.
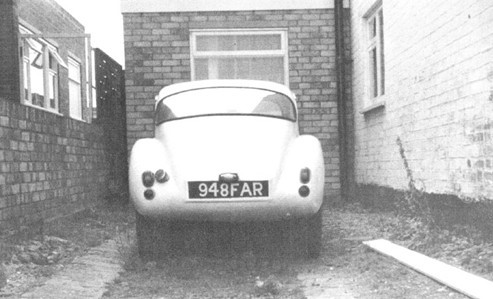
948
FAR NEW GT
The finds of new Rochdale GT's to the register is happening with regularity, I think I have listed a couple every magazine but there is still plenty more to sniff out. This latest clue to a Rochdale was found on an internet forum entry from Mr Leete, it read:
I was once a part owner of a Rochdale with Peter "Mad Dog" Smith who now has a business in Yorkshire re-building Hewland racing car gearboxes. We had just done the Falcon Guy Fawkes in his old Anglia and were full of enthusiasm (this was around 1968). We brought it home and in an evening of frenzy stripped it almost to the bare chassis. There it lay. I went off to do a student placement in Munich for six months and when I came back his Dad had dumped it!
A short internet search later and I found the location and contact details for Peter Smith, luckily the forum entry stated the business provides a service for Hewland racing car gearboxes, easier to search for that than the fairly common name of peter smith! Peter replied to my email almost instantly:
James, you've got the right bloke. Michael Leete has got the dates a bit wrong. My family and I, along with them moved out of London in the summer of 1968 to a place called Arlesey in Bedfordshire and I started competing in rallies and trials with Michael as navigator. I bought the Rochdale as a runner from somewhere around the Welwyn area I think sometime around '70-'72. It was one of the early ones on an E93A chassis and running gear, the body was white gel coat. I moved to Yorkshire in the summer of '73 and shortly after this my father did in fact give it away, to a local chap who had enquired about it, as he wanted the space it was parked on to extend the house. I think the chap was from Stotfold. Best regards, Peter D. Smith
I write:
Peter, Very many thanks for the prompt response, I have details of 250 Rochdale GT's on the register and this one is new to me, not too surprising as approx 1500 GT shells were produced so I have some way to go to find them all! There are a few clues in your email that might tie in this shell to the unregistered ones we know about or ones that appear in peoples sheds but having typed in Welwyn, Stotfold, Arlesey nothing has cropped up so it is probably deep in a garage somewhere in Yorkshire. I appreciate it was many moons ago that you owned the car but if anything else comes to mind it would be great to hear about it.
Now the picture doesn't give much away and there is not much info in this story but you never know, it might just trigger a memory in someones mind?
Roger
Coupes Rochdale Paperweights
Since the Rochdale event last year, Les Brown & I have talked a number of times about the dream a few members have to get an example of each Rochdale Car lined up together in one place at the same time. As this will be some time way in the future I thought as a first step it would be interesting to extend the range of my Rochdale Car Paperweights.
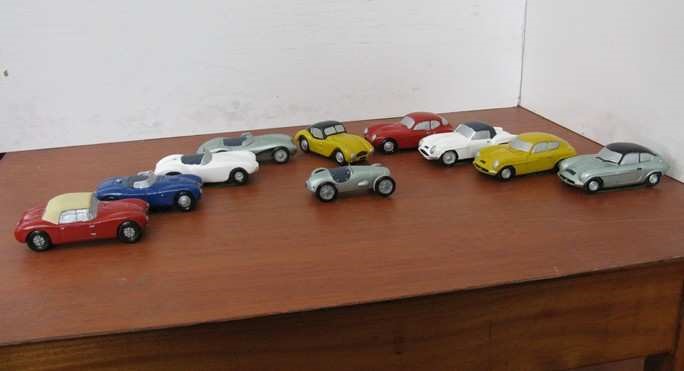
From left to right in the above picture:- Mk6(Paramount); Mk6(Buckler); F Type; C Type; ST; GT; Riviera; Olympic Ph1; Olympic Ph2; & centre stage is the Mk2.
If anyone would like further information & detail photos of specific models, you can contact me as set out follows:-
Phone:- 01606 889384.
email:- rcoupe258@btinternet.com address:- Magpie Cottage, Chester Rd. Sandiway. Cheshire. CW8 2DP.
OLYMPIC
REGISTRAR Phase 1 vs Phase 2
To the untrained eye there are only a few differences between the phase 1 & 2 Olympics, the opening rear hatch and the larger bonnet opening being the immediately obvious ones. However, once you delve in more detail you realise that in fact they are two completely different cars. I hope that the following will help to explain the major differences.
GRP Monocoque The outer shape of the top part of the car is the same, apart from the rear hatch opening and the larger bonnet opening mentioned above. However, as the moulds for the phase 2 would have been created, I would assume, from an existing phase 1 shell there are likely to be minor discrepancies due to the shrinkage that takes place during the moulding process.
Underneath however, things change considerably. The phase 1 has a full length undertray, with openings only below the engine and differential. The transmission tunnel is fully enclosed making access to the gearbox and propshaft UJs somewhat problematical.
On the phase 2 however, the underside on the tunnel is completely open. At the rear the boot floor sets up over the axle. This means the rear bodywork, below axle centre line, is cut away giving a different and to many eyes a less clean rear view.
As well as a larger bonnet opening the phase 2 also has a moulded in inner liner to the engine bay, giving a cleaner line and also creating a ducted outlet from the radiator, which is in its own area forward of the main engine compartment.
Of course the very early 'pre fire' shells had an even smaller bonnet opening than the later phase 1s, just to add a further variation.
Moving inside the car the different front and rear suspension, of which more later, mean that the internal mouldings are also completely different.
On the phase 1 there are bonded in 'ramps' that support the seats. These also form the rear mounting of the front suspension torsion bars. On the phase 2 however, the floor is completely flat.
At the rear the phase 1 incorporates turrets that support the vertical coil spring damper units. This also separates the 'plus two' rear seats from the boot area.
Doors, Again, whilst the outer shape is the same (subject to the shrinkage comment made above) the phase 2 doors are thinner, giving more internal cockpit width.
As well as this, the phase 2 uses different window winders and door locks, meaning that the internal mouldings are completely different between the two. It should also be noted that there are two different designs of inner door mouldings fitted to the phase 1s, although the doors seem to be interchangeable.
The door window frame is also constructed differently at the front edge. Later phase 2 frames were also fabricated from a larger section aluminium, giving a more rigid assembly.
Rear Hatch, Only the phase 2 has an opening rear hatch, although a number of phase 1s have been converted, one or two by the factory. To accommodate this the top corners of the rear window are a slightly different shape.
Dashboard, The phase 1 uses a separate binnacle, behind the steering wheel, to house the instruments, whereas the phase 2 uses a full width dashboard moulding, with a small 'hump' to house the three main instruments.
Front Suspension, The phase 1 uses the Morris Minor/Riley 1.5 torsion bar system, whereas the phase 2 uses that from the Triumph Herald/Spitfire. This results in the 'bonded in' front sub-frames being completely different.
Just to add complication, when the phase 1 moulds were no longer considered usable anyone who ordered a phase 1 was supplied with what was in effect a standard phase 2 shell with a phase 1 type sub-frame bonded in.
Rear Suspension, Both marques generally used the Riley 1.5 rear axle, but the method of location and hence the welded on brackets are completely different.
The phase 1 axle location is by two lower and one upper tubular radius arm. This upper arm sits above the offside lower arm. The axle ends contain a small 'silentbloc' bush, whereas the front ends are bolted through the GRP with large diameter rubber donut bushes.
Sideways location is via a tubular arm the runs from the forward end of the offside lower arm to the centre of the axle below the differential. The coil spring damper units fit directly to the top of the axle casing.
On the phase 2 the rear axle is located by two 'box' section lower trailing arms, with 'silentbloc' bushes at either end. A single tubular upper arm near the centre of the axle provides torque reaction.
Lateral location is by a tubular diagonal full width Panhard Rod. The coil spring damper units locate on the lower arms forward of the axle centre line.
Having said that both marques use the Riley axle, some late phase 2s were fitted with a Ford axle, sourced I believe from the Corsair. In Rochdales usually perverse way they welded the trailing arm brackets in a slightly different position on the axle, meaning that the actual trailing arms were not necessarily the same as the Riley axled ones.
Engine, Generally the phase 1 used either the Morris Minor or Riley 1.5 engines and the phase 2 the Ford 1500cc GT engine. However, any combination of the above could also be applied to either phase.
Except for the early phase 1s the engine is mounted from the front sub-frame, whereas in the phase 2 it is mounted from the engine compartment side panels.
Conclusion, Although outwardly similar, in fact the phase 1 and phase 2 are completely different cars and only a limited number of components are interchangeable.
Fortunately, one item that did not change (apart from the prototype) is the windscreen. The door glass also seems to be the same for both marques, although not the same side to side!! Olympics also tend to be the sort of cars that are modified by the various owners during their life, so very few will actually be identical to when they left the factory.
As a number were supplied as bodyshell only rather than a complete kit quite a number would have been different from day one!
Whilst I have referred to Riley components of course some were constructed with Morris Minor parts giving smaller brakes.
Hence, when asked, for my advice as to what component is fitted to my car? my answer is always slightly guarded.
* * * * *
* * * * * * * * * * * * *
Back in the early 1980s, whilst manning the Club stand at the Brighton Classic Car Show, I was approached by an Anthony Strong who then owned a phase 1 Olympic (682 NDV). Shortly afterwards the car appeared for sale on the forecourt of the Old Forge Garage, Rewe, Exeter. At that time the car had additional lights with pods grafted onto the bonnet. I believe these were sourced from a Citroen?
The car then disappeared from the records until a couple of weeks ago when it was purchased by Roy McNight and now resides in Haslemere. This is not a million miles from me, so I can see a trip coming on. I believe Alan has already visited, so is more up to date than me as to its current condition.
Also in the same area is Richard Hancock who is restoring a phase 2 (AAW 840A). Richard is trying to undo all of the modifications done by previous owners and return to car to more original condition. This particular Olympic was originally registered 808 JCG, but lost this in the early 1990s. The car was originally built by D C Murphy of Hythe, Southampton, whose widow kindly provided copies of the original documentation about a year ago.
112 XPG, a phase 1, is the only Olympic that I have ever seen with the original bonnet badge that featured the 'Olympic Rings'. As this is a registered trademark of the Olympic organisation, I assume Rochdales were forced to change the badge.

I first saw the car in the mid-1970s, but it was then taken off the road for a rebuild, which never seemed to happen. I last saw the car for sale by Keith Ardley in 2005. I understand it has recently found new ownership with Johnathan Middleton. Hopefully, this time the rebuild will actually happen.
2481 AW is another phase 1 that has recently changed hands and is now with Gary Pearce.
The Editor has been doing a bit of head work on his phase 1 Olympic 'Kermit' with the idea of extracting a little more performance from the 1275cc A Series engine. I understand that things did not go too smoothly as I am sure you will read elsewhere in this publication. Just goes to show the problems that can arise when you want to go back to being a 'boy racer'.
Ben Bettell was making good progress with his unregistered phase 1 (the Scottish car). I believe that most of the mechanical works have now been done, but fibreglassing is waiting for the warmer weather. However, I understand he has now caught the Turner bug, so does this mean another Rochdale rebuild on the back burner? I hope not.
I understand that our erstwhile treasurer may also be looking at Turners, so does this mean that yet another Olympic rebuild could be on hold?
My own Olympic is also languishing, awaiting fibreglassing. The gearbox has been overhauled by Heathrow Transmissions. I bought the gearbox over 20 years ago, supposedly in good condition. However, as phase 1 Olympics are not the easiest cars to change gearboxes in I thought I would bite the bullet. It turned out that this was a wise decision as the overdrive was completely shot. I would have cursed if I had got the car back on the road before I discovered this!!
By the time you read this I will be a man of leisure, so there will then be no excuse for not completing my Olympic and make a start on the Riviera. That's the plan anyway!
Derek Bentley