MAGAZINE No 121 SPRING 2010
Edlines
Do take the trouble to read the FBHVC
articles in these magazines for example this issue contains a lot of very
informative and useful advice, from fuel to registration to scrappage to
antifreeze and more.
For what is Rochdale famous? I knew
of the Co-op and Gracie Fields, but I discovered that one John Ravenscroft, aka
John Peel, also had associations with this town. He worked at the Townhead
Mill as a teenager and later played many of the records recorded under John
Brierley at Cargo Studios (later Suite 16) on Kenion Street (off Drake Street),
which was very active in the 1980s and helped to launch the careers of many
young bands.
Rochdale
Social Event
Hi All,
A New Year and a new attempt at getting
a Rochdale Social Event off the ground!
The RAF Motorsport Association opens
up its old Bloodhound missile section at RAF Barkston Heath to motoring clubs
to have track days and speed trials. This is a great opportunity to test your
cars and driving skills, you are the only car on the track at any one time so
risk of damage to your car is very minimal with good run offs should you need
them; more info can be found at:
www.raf.mod.uk/rafmotorsports/4wheels/rafmsaspeedchallenge.cfm
For 2010 I have reserved 4/5
places on the RAFMSA track day on Saturday 3 July. The format is a sprint style
track day, with open pit lane. There will be around 30 to 40 cars at each track
day but I can assure you your track time will be more than enough! The cost will
be a very low £50 for the whole day and includes as many sprints as you can
manage; all you need is a helmet and a car! This is a professional event and
fully marshalled and accurately timed. Saturday evening will be camping at the
nearby bubble car museum rally field at £5 each, they do have a B + B option at
the museum, £28 for single occupancy and £50 for double occupancy should any
off you want to cuddle up!
http://www.bubblecarmuseum.co.uk
We will also get a chance to look
round the museum and if time allows get some photo opportunities at the nearby
RAF Cranwell with the cars. A few social drinks in the evening regaling our
stories from the day's events. On the Sunday I should be able to arrange a
professional presentation and hands on practical of GRP repair techniques about
15 miles away from the bubble car museum. If you copy
http://www.youtube.com/watch?v=_NELlwZW_Fs
into your internet address bar, you will see an in car video
of the track. There are also loads of other videos if you just type in
"Barkston Heath track day". A very professional and great day out.
So to recap:
Saturday day, Sprint challenge,
Saturday eve, Bubble car museum
and a few beers to recap on the day's events.
Sunday morn, possibly back at the
track if I can organise it.
Sunday fternoon, GRP presentation
A bargain price and an exhilarating
day out. All I ask is that I can be a passenger in someones car!
Initially all I require is a
realistic indication of how many cars/owners want to participate so I can plan
likely attendance. I might also open this up to other 50's / 60's specials if
the numbers aren't enough.
So, anyone who is interested and
will have their cars on the road for this years Rochdale Anniversary, let me
know by the 18 March 10 and I'll reserve you a place.
James Farrington
TONY STANTONS EVENTS PAGE
STONELEIGH KIT CAR SHOW 2ND & 3RD MAY
2010
Just to let you know I have reserved
stand Number 39D for all HISTORIC SPECIALS AND CLASSIC KIT CARS built before
1973 at the N.A.C. Stoneleigh Park, Warwickshire, the show for every kit car
enthusiast with old or new kit cars. Sunday 2nd and Monday 3rd of May 2010,
from 9.30am till 5.30pm. (May Day Bank Holiday weekend).
All kit car drivers are admitted
free of charge, passengers are1/2 price.
You can camp on the site, tents and
caravans, please contact the organisers office 01775
722900 for details and forms
www.grosvenorexhibitions.co.uk
This is a very good cheap day out,
spares are cheap, where else can you buy brand new crossflow radiators for £15
to £20 and new electric cooling fans for £5?
There are 5 large Exhibition Halls
and 600+ Trade Stands all the things you need for your rebuild or update. You
can look at new kit cars in rolling chassis form indoors in the dry and warm
which will give you ideas on suspension, brakes and drivetrain modification for
your car.
This is the best show of the year
for kit car engineering.
Come to the main vehicular entrance
which is located on the B4113, the Coventry to Leamington Spa road (follow
signs for clubs and exhibitors (do not go into the Public car parks) NB only 2
miles from where we used to have the A.G.M.
WITH CAPESTHORNE NO MORE, LET'S HAVE
A GOOD TURNOUT OF ROCHDALE
CARS AT THIS EVENT INSTEAD,
PLEASE tell everybody you know with a
suitable car and place details on websites if you can, let's have a good
turnout of Rochdale cars.
Contact Tony Stanton (Rochdale
Olympic 902DUF) tony-stanton@fsmail.net
7th PRESCOTT HILL CLIMB CLASSIC CAR EVENT 9th
May 2010
Any R.O.C. member attending this
event with their Rochdale please contact Derek Bentley or Tony Stanton.
SILVERSTONE CLASSIC on July 23rd, 24th & 25th 2010.
In conjunction with the F.S.C.C. we
have secured a designated display area within the Historic Grand Prix circuit
at this 3-day event, and we are seeking further club marque cars to join us on
display during the weekend.
Featuring 22 races, 800+ competitors,
and 600 of the most valuable race cars and motorcycles in the world. On top of
the mouth-watering line-up of races lasting between 20 minutes and 1 hour each,
starring the very best single-seater, GT and Touring Cars from the past 80
years, the entire infield will be packed with more than 4000 classic cars
showcasing in excess of 50 famous marques.
There will also be a period funfair,
air displays, trade stalls, live music, barbecues and more than 30 hot air
balloons are set to fire up for their traditional morning and evening fly-outs.
DUFFY and I have been to this fabulous
event for the last 5 years and I think it is better than Goodwood. You can
walk around the paddock and in the pit garages at any time, talk to the
drivers, watch the mechanics working on the cars close-up and just to wet your
appetite the last race on Saturday is a 90-minute race for Sports Racing Cars
from the late 60's (i.e. GT40s Lola T70s and Chevrons) racing into the dusk
with their headlights on, so be there with your marque car you are going to
love it (ask Derek and Alan).
To enter your club car in the
FSCC/ROC display area please contact Tony Stanton on 01527 402367 or tony-stanton@fsmail.net
and I will issue the club reference number to quote when booking tickets and
Marque Car passes.
American adverts
Thanks for this to James Farrington
who found Olympics mentioned in old American car magazines (the wonders of
the Internet and Google).
a) Sports Car
Graphic July 1964
Sports Car Graphic has on
several occasions carried mention of the so called kit car the Rochdale
Olympic. Some of your eastern readers may be interested to know that an Olympic
is now operating on the East Coast. Acquiring a small car by mail is in itself
a sporty proposition, but it has been very well worth the bother. The car is
delightfully agile and responsive, being powered by the English Ford 116E
engine that was featured in your magazine. The full monocoque fibreglass body
is rigid and tight and has exceptionally pleasing lines fore and aft. All in
all, the car offers more real personalized sports car for the money than can be
approached in any other way! The total cost to my front door including all
transportation, duties, etc was about $2450. I would be happy to correspond
with any of your readers who are interested in the Olympic. Robin Rackham's letter
- similar to this one - appeared in your Jan 64 issue but the address he gave
was insufficient, and my letter to him was returned undelivered.
John D Bitner, 1407 Ellenglen
Road, Towson 4, Baltimore, Maryland, USA.
b) Sports Car
Graphic July 1965
ROCHDALE OLYMPIC PHASE II GT 2x2
Kit, Fibreglass, Cortina 1500cc tuned Ford, 100 mph + 35 mpg, Major components
custom factory installed. 75% complete, Needs:
Instrumentation, seats, exhaust,
brakes (supplied) lacquer. Best offer.
Martin, 2151, 8th Ave, New York,
NY 10026, USA
c) Car and Driver
July 1971
1965 ROCHDALE OLYMPIC PHASE 1
1.5litre GT. new 1963, 1600cc MGA drive line, new BFG 990s, mechanically
excellent, needs paint job, best offer over 1,000. Don Usher, Allen park, Michigan 48101, 313 388 3817.
FBHVC NEWS
Fuel Changes
Update
A further Stakeholders Meeting took
place in October at the Department for Transport (DfT) in London. Following the
meeting an information leaflet was issued to help those who may be affected to
prepare for the proposed fuel changes. [Only petrol information is given
here Ed]
Ethanol in
Petrol
Concerns expressed by Federation
members have been raised, in respect of fuel system corrosion and also high
fuel volatility, which has been causing operational difficulties. The oil
industry position is based on a safety concern over reduction of volatility.
The validity of the safety concern was questioned and is now being checked by
DfT, but it seems unlikely that there will be a reduction in fuel volatility
other than a small correction to reflect the blending of ethanol into the fuel.
It is confirmed that Shell V-Power
petrol is currently guaranteed not to contain ethanol. It is not an exchange
product, being unique to Shell, so is under their close control, unlike most
other fuels sold at filling stations. Thus for the time being, members wishing
to avoid petrol containing ethanol can buy this product, which also has the
advantage of being widely available.
The issue of corrosion concerns with
petrol containing ethanol is being pursued further, but at present there is
nothing more to report.
Lead
replacement additives
Testing for suitable lead replacement
additives took place prior to the withdrawal of leaded fuel in 2000. Since that
date only very small quantities of leaded petrol have been permitted to be sold
for historic vehicles by licensed garages who are members of the FBHVC.
The Federation originally tested 12
products to assess their performance in protecting against valve seat recession
using identical test procedures on a Rover A-series engine. The results were
conclusive and showed clear differences in performance between the various
products tested. Those products that did pass the test were allowed to carry
the FBHVC logo and the words: endorsed by the FBHVC or: This
product has been subjected to a valve seat recession test by an independent
test house on behalf of the FBHVC. The results of the test indicate that the
level of valve seat protection is likely to be adequate for all normal driving,
but not including racing or other exceptionally arduous uses.
Since then a number of these products
have been withdrawn from sale but the following are still available:
Millers VSP-Plus
Red Line Lead Substitute
Castrol Valvemaster and Castrol
Valvemaster Plus
Each of these products has a
different active ingredient and it is recommended that these products are not
mixed in the petrol tank, in other words, choose one product and stay with it.
Tetraboost, which contains tetraethyl lead is, of course, also available from a
number of stockists.
DVLA
Nigel Harrison
The Federation recently had one of
the regular meetings with DVLA which was as usual very informative. Some of the
points raised are detailed below.
Registration of
historic vehicles
The DVLA leaflet INF
26, Guidelines for the Registration of Rebuilt or Radically Altered
Vehicles and Kitcars, gives
definitions for Radically Altered Vehicles and Reconstructed Classics and
allocates a point score to the various major components of the vehicle. The
chassis or monocoque bodyshell scores five points; suspension, both axles,
transmission, and steering assembly all score two points each; the engine
scores one point. If an already registered vehicle is radically altered then,
provided it scores more than eight points, it may retain its original
registration number. For a vehicle with a separate chassis, the body is not
scored by the points system, so a new body should not affect the retention of
the registration number.
However, for a vehicle where either
there is no documentary evidence to claim the original number, or if the
original number is unknown, then an age related number should be allocated
assuming the criterion of Reconstructed Classics is met. The definition is: Vehicles
comprising genuine period components of the same specifications, all over 25
years old, will be assigned an age-related registration mark. The appropriate
vehicle enthusiasts club must confirm the authenticity of the components.
I had assumed until now, that the period components were the major mechanical
components in the radically altered points system.
However, it appears that this may not
strictly be the case. The consequence of this is that the installation of a new
body prior to registration could mean that the vehicle is allocated a Q
plate. The principle is for genuine period components of the same
specifications, all over 25 years old should be used. It therefore follows
that the vehicle should be registered with its existing over 25 years old
body still in place provided, of course, that it can meet the MoT requirements.
Only when the vehicle is registered, should a body replacement be
contemplated.
This particular case came to light
because the owner passed to DVLA a receipt for what could be interpreted as
being a new body. There has been another case where the DVLA local office has
required that form V627/1, entitled Built Up Vehicle Inspection Report
is completed. This form requests receipts for replacement parts. It is
perfectly understandable that if DVLA are given information they will take it
into account when assessing the vehicle. The moral of this story is that if it
is an age-related application, careful consideration needs to be given to how a
vehicle and its documents, including the covering dating letter/certificate, are
presented to a DVLA local office.
Declaring SORN on
a newly acquired vehicle
SORN (Statutory Off Road
Notification) is only applicable to a vehicle whose licence disc expired on, or
after, 31 January 1998. If you have just acquired a vehicle that is subject to
SORN, a recent case has indicated that the on-line SORN system should not be
used to declare the initial SORN under your new ownership. This is because of
the way in which the SORN legislation, and on-line SORN system works.
If a vehicle is being taxed, then it
is perfectly normal for the new owner to take over the unexpired period of tax.
However, the SORN period starts at the beginning of a month, and then stops
when there is a change in ownership. The online SORN system can only start a
period of SORN at the start of the month, and then stops that SORN when the
ownership changes. SORN cannot be made online within the month of registering
as keeper.
If you have acquired a vehicle, and
you are going to declare SORN, as well as filling in the V5C to register the
change of ownership, (or V62 if V5/V5C was missing) it is essential that you
fill in a V890, (SORN form) as well. The V890 SORN form is available for
download on line from www.direct.gov.uk, or should be available
from a main Post Office. Staple these forms together, and send to DVLA Swansea,
SA99 1AR. I would suggest that it is always wise to make copies of these forms
before sending them off.
You should receive written
confirmation of the SORN declaration within four weeks. If no acknowledgement
letter is received, then the DVLA instructions are that you must contact
Customer Enquiries Group on 0870 240 0010 immediately.
In summary, new keepers should make a
SORN declaration via the paper based SORN V890 application form.
Scrappage
In response to a question from one of
our member organisations regarding how an historic vehicle that has passed
through the Scrappage Scheme could be saved, the Department for Business,
Innovation and Skills (BIS) sent the Federation the following statement:
A Certificate of Destruction must be issued for all
Scrappage Scheme vehicles. Whatever their age or condition, these vehicles are
effectively being declared End of Life Vehicle (ELVs) by their last owners at
the dealerships which accept them. To comply with the 2003 ELV Regulations, the
vehicle must be initially treated at an Authorised Treatment Facility (ATF), to
the standards required (fluids drained, battery and tyres removed, airbags
deployed or removed), and it would then no longer be classed as hazardous
waste. The scrapping process could stop at that stage and the vehicle could be
preserved and sold on, should the ATF wish to do so. Although a vehicle should
not be put back on the road, even if this is possible, it could be saved for
display or donation to a museum.
Further information is available
from the Vehicle Scrappage Team, Tel: 020 7215 5000
Email: scrappage@berr.gsi.gov.uk
ANTIFREEZE
Technology moves forward and new
products are constantly being launched with claims to improved formulations and
performance. With the recent bitterly cold weather in January antifreeze has
been in the headlines, with some alarming stories which at first seem to be
about the well-known tendency of antifreeze to find the tiniest hole and cause
leakages but in these cases it has led to catastrophic engine problems.
Traditional blue ethylene glycol is a
toxic but highly effective antifreeze and contains silicates as an inhibitor to
help prevent corrosion in an engine with mixed metals in its make-up.
Bluecol and Blue Star are well known
brand names and both of these are declared suitable for classic cars on their
company websites. Be aware that there are also low- or no-silicate ethylene
glycol formulations (usually red) available which may not be suitable for all
engines.
Propylene glycol is another
well-known and less toxic antifreeze formula and usually contains silicates but
Comma, the main manufacturer, have now discontinued it in favour of an ethylene
glycol product containing bittering agents to make it less palatable and
minimise the risk of accidental poisoning.
Both of the above products use
inorganic additive technology (IAT). Recently problems have been reported
concerning the use of antifreeze mixtures using organic acid technology (OAT).
OAT was introduced in the mid-1990s and the products are biodegradable,
recyclable and do not contain either silicates or phosphates and are designed
to be longer lasting. However, these products do seem to cause problems in
older engines; over and above the ability of antifreeze to find the smallest
crevice and leak. OAT antifreezes have been accused of destroying seals and
gaskets and causing a great deal of damage in old engines. For this reason,
the manufacturers do not recommend their use in historic vehicles. These
products are usually coloured red, pink or orange.
The final category is HOAT. These
products use hybrid organic acid technology in an ethylene glycol base with
some silicates in the formulation alongside the organic corrosion inhibitors.
The product is usually coloured green and are not recommended for use in
historic vehicles.
The Federation are still researching this problem but
our advice at the moment is:
only use blue coloured IAT antifreeze in historic vehicles;
only use OAT products (advanced or long life antifreeze) if
the vehicle used it when new and if specifically directed by the vehicles
manufacturer;
never mix different types of antifreeze without thoroughly
flushing out the system;
always replace the coolant within the time scale specified by the
antifreeze manufacturer as the corrosion inhibitors break down over time.
DRIVE IT DAY
We have been very busy already
answering the question when is Drive It Day 2010. The event is always held on
the nearest Sunday to 23 April, so this year it will be 25 April 2010. This day
was chosen five years ago to commemorate the 64 cars that set off from London
on 23 April 1900 on the first day of the Thousand Mile Trial an incredible
undertaking and one which we believe deserves an annual celebration.
We have had so many requests to
advertise DID events that we have made a dedicated page on our website events
section for just this day. The same rules apply as for other events member
organisations may add details using their ID number and password issued last
year.
The Royal Oak at Bishopstone
(about 5 miles east of Swindon, SN6 8PP, 01793 790481), a superb venue with a
self-confessed classic car nut for a landlord, and with excellent food and
beer, has once again indicated that they will be delighted to welcome all
comers on the day.
EARLY ROCHDALES
James Farrington
Now that I've finally moved
house, I've unpacked the boxes, settled my Olympic into its new garage, managed
to find a home for all my tools (that doesn't involve a kitchen cupboard) and
organised the garage by stacking all my spares in a fashion the Tate gallery
would be proud of, I can now do some work on my Olympic project (Olympic in
both senses of the word)! My challenge is to see if I can get the bodywork
finished before the birth of my next child, although that is 6 weeks away and
since in Rochdale work years that multiplies by 20, there goes that pig flying
by my window again!
Anyway, enough ramblings on, not
only has it been a busy few months for me but also for the early Rochdale
scene; every few weeks a new discovery has been waiting and the surprises just
didn't stop appearing! I do try and vary the Marks of Rochdales talked about
in this section of the magazine but I'm afraid the GT is going to feature a
fair bit in this issue as 8 have reared up in the past few months! So, where to
start???
UNKNOWN MARK VI
I'll start with the discovery of a
Mark VI Rochdale that I can't really take the credit for. With not having much
time to rummage around the World Wide Web over the past few months it was with
great pleasure that I received a call from a Rochdale member pointing me in the
right direction of a past Rochdale Owner. It is a great embarrassment though
that I can't remember who it was, please remind me and I'll give credit where
credit is due in the next issue of the magazine. It was a few months back and
I've had one too many Christmas/New Year parties since then, only excuse I can
come up with, my apologies!
Following the initial lead of just a
phone number, I managed to speak to a surprised gentleman called Phil Matthews.
I say surprised because his opening line was Blimey that was more than 50
years ago! When trying to trace the history of these cars I ask details like
names of people sold to and bought from, but memories tend to fade and this
unimportant information to some normally disappears into history. Luckily
Phils memory has stood up to the test of time and he managed to track down
some pictures!
Phil writes:
Success at last, I found the
pictures of my Mark VI lurking in a dark corner of my computer. I am afraid the
quality is very poor, and I have searched for the originals (which may have
been a little better) in vain, so I hope these will do? They were taken with an
old Brownie Box camera and have deteriorated over time.
With regard to the car, I think
you already know that it was built on a 1938 Standard Flying Nine, which my
Father had handed down to me in about 1958. I had to sell my Gold Star bike
(due to Police harassment) so I spent some considerable time stripping the
engine down and reconditioning the Standard. Unfortunately, in avoiding a
head-on collision with another car, I rolled the Standard over, and wrote it
off!

Having spent the time and money on
the car, I didn't want to scrap it, so I decided to put a Rochdale shell on the
chassis. I used heavy duty plywood for the floor and aluminium sheet to make
the wheelarches. I made a wooden dash and used the original instruments from
the Standard. I had it registered and put on the road, and had quite a bit of
fun with it before I met my wife to be, and sold it before I got round to
fitting a windscreen. I hope this helps your Magazine, and is of interest to
your members?
This is only a small piece of history
from one of these rare cars but nevertheless it could be another piece of the
jigsaw that will come in handy further down the line. This now makes the total of
Mark VI Rochdales known to the registrar as 29, still a long way off though
from the 150 estimated that were produced! While I'm on about the history of
these cars I'd just like to reiterate, if you know of anyone owning a car or
have any knowledge of an early Rochdale please get in touch as everything
helps, no matter how small (size doesn't matter in this case)!
If anyone is interested, there is
still a Mark VI for sale in Germany for 9900 Euros. Type the following address
into your web browser to view it:
http://www.wellssow.de/autodb/readpub.php?f=2&i=82&t=82&seite
UNKNOWN GT
I found the picture below whilst
surfing the net, looking for any information on Rochdale cars that has not
already been collated. I don't have much information surrounding this
particular one but I thought I'd show the Rochdale Community to see if it rings
any bells?
The article states:
The picture was taken after a
treasure hunt in 1960. The car is a Rochdale GT and was built by Arthur James
from Beverley. The car is built around a chassis from a 1937 Ford Prefect. The
following picture shows some members of the club in the early days. The trophy
shown on the bonnet of the car is now used as the Grovehill Trophy for our 12
cars
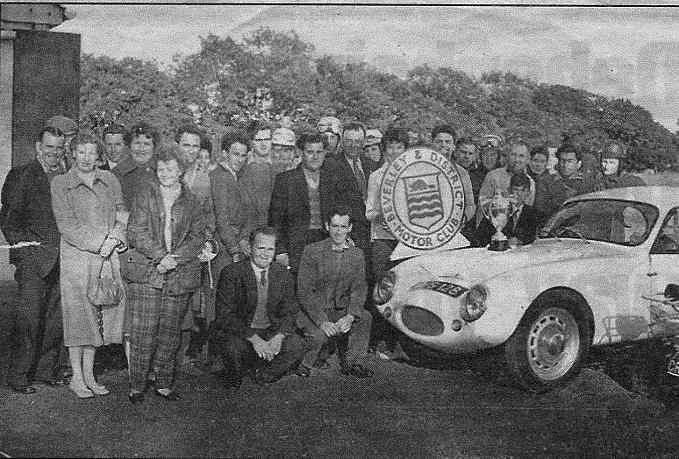
Picture courtesy of Hull Daily
Mail Publications
There are a few clues in the
article but as of yet I've not turned up trumps with any more information. Have
any of you ever been involved in the Beverley and District Motor Club? The GT
pictured is not known to the Early Rochdale Registrar but was obviously
treasured by someone in this popular motor club at some time. If anyone can
shed any light on this photo or fancies trying their hand at some internet
sleuthing, then please get in touch. Maybe we should have a competition page in
this months magazine called spot the owner, my moneys on the guy in front of
the headlight, any takers?
JOHN SAXON GT
I was really happy when this next GT
picture appeared on my computer screen, mainly because I had decided to search
for Ford Specials on an image search engine and out of nearly 21 million
pictures available this one popped up almost straight away!
The article accompanying the
picture read:
What a blast! Woodford was a
great place, working with a super bunch of guys! I had (for its time) a
sexy-looking fibreglass Ford special car at the time. Actually it was a total
heap, running on a hotted-up Ford sidevalve engine. But it looked vaguely like
an Aston Martin DB2/4 (or so I thought) and as I fancied myself as a bit of a
James Bond type, the car was ideal for me. When we got some snow it was great
to drive around the Airfield on full reverse lock using the throttle to steer
got up to 70mph sideways on more than one occasion. The Data Analysis section
used a hut out on the airfield with a car park covered in cinders out front. My
big thing was to come screaming into the car park and do a nice
handbrake-induced slide though 180 deg with the object of being neatly parked
at the end of it. Unfortunately, I overcooked it one day and sideswiped Doug
Harriss Rover. As he was also my boss, he was definitely entitled to take a
dim view of this. I remember that Doug was remarkably good about it, but I know
what I'd say to my son if he indulged in such behaviour!
This time I managed to track down the
owner, a Mr John Saxon who has since emigrated to
Australia. Answering in a very
familiar tone to my regularly asked questions,
John writes:
Hi James, WOW that's nearly 50
years ago! I have to be honest when I say that as a Testosterone-driven young
guy - I was far more interested in looking like a James Bond type than
maintaining cars - and the Rochdale (had forgotten the name) was the closest
thing I could find in my price range that looked vaguely like a DB2/4!
I bought it secondhand - sorry
no record of the transaction, and I don't know if the guy I bought it from was
the original constructor. It was probably based on a Ford chassis - certainly
it had a hotted-up Ford E93A sidevalve engine! And from memory it had a heavy
Van clutch with a 3-speed close ratio box and a very high differential ratio.
It was extremely tricky to get going from stationary on a hill owing to
fearsome clutch judder. Lots of work needed to be done on it but I was too busy
having a good time. I even had the bonnet blow up and almost block my view one
day while driving across Vauxhall Bridge in London! The only car I ever had
where I ran out of petrol, oil and water almost simultaneously!

When I came down to Australia on
my first couple of trips before migrating, I almost had it shipped out. I had
visions of reproducing the shape in fibreglass - no worries about intellectual
property in those days! But in the end I had to leave it with a 2nd hand dealer
on consignment (in Bournemouth I think) - and it sold for almost nothing.
About all I can remember
unfortunately. If I come across any documentation or more photos I'll let you
know, but I really don't expect to find anything. If you do manage to track any
of its history - I'd be interested to know about it? I have attached another
picture (B & W unfortunately, the car was solid Red colour) - but this time
you can clearly see that the registration number was 965 CJH. I think it's the
only picture I have.

Malcolm writes:
Isn't it a shame that the
high-spec cars have always disappeared - I have a theory that the highspec cars
were stripped of their best bits and scrapped when they failed an MoT, because
the tuning bits were worth more than the car, whereas the basic-spec cars just
got pushed to the back of the barn/garden intact and survived. With close ratio
gears and high ratio axle (probably 4.4:1) it would have been a nightmare for
hill starts with 17in wheels - probably the builder had a set of Ballamy 15in wheels
on it but took them off when he sold the car. Mind you, with a tuned engine it
was probably good for 90mph on the big wheels!
THE FUTURES BRIGHT, THE FUTURES AN ORANGE GT!
Normally I get up with my usual
dreary morning eyes, I pick up the mail from the front doormat and open the
usual bills and junk mail, but occasionally I'm woken from my dreary morning
blues by something quite exciting and this is no exception!
As I opened the envelope I
instantly recognised the Owners Club application forms but it was the pictures
that fell out that really caught my eye, there on the table were 3 pictures,
not the usual projects I see but a highly modified roadworthy example! With
only around 4/5 roadworthy examples known (1 later in this article) I was shocked
I'd not heard about this before!
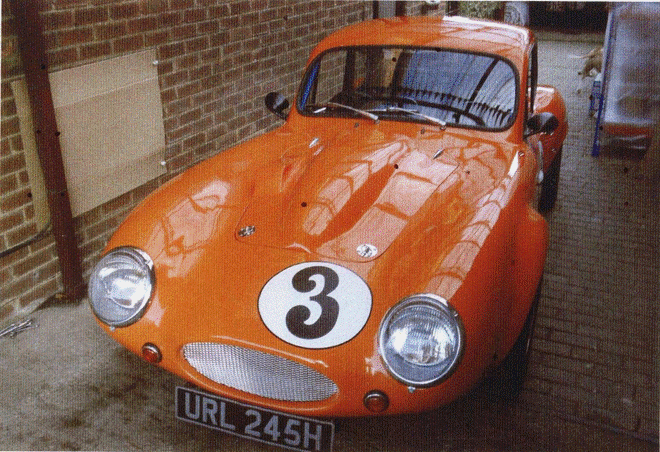
Patrick Martin writes:
The car is in extremely good
condition inside and out, having been totally rebuilt between 2003 and 2006 and
having only done 10-15 miles to and from the MoT station in September 06 until
the present day. Body sprayed in 2-pack paint, and overall look is stunning.
The interior was all new, seats, carpets, door vinyl and vinyl headlining and
still all looks very tidy. The wheels and tyres are as new.
The chassis, suspension and
brakes were all refurbed and are all in good working order, reconditioned
engine runs superbly! Homemade dash using Triumph GT6 dials and switches
finished in padded black vinyl being both neat and functional, with working
heater and fan.
Wanting to know more information
about this I gave the owner a call:
The car was bought from Margate,
Kent from a washing machine repairer whose surname was Davies. The seller of
this car bought a house in the late '90s and found the car sitting in some
outbuildings! This owner purchased the car in 2003, it was on a rolling chassis
with sidevalve engine and it was never registered! He did a restoration until
about 2006 putting the shell onto a GT6 chassis (hence the larger rear arches).
It was MoT'd and has only done 15 miles between 2006 and 2009, staying under a
cover in the yard for the past few years!

DAVE SPILLER GT RESURFACES
As I hinted in the previous
article, the next GT has resurfaced and from the look of it in better condition
than ever. I'd seen snippets of this car in a few magazines including the
January issue of Complete Kit Car Magazine from the Classic and Kit Car show at
Exeter last year but confirmation that the car still resided with club member
Dave Spiller was only received via his son, Paul Spiller, when he joined the
ROC last month! [Picture supplied by grandson James!]
This GT is a particularly special
one within the club as it has been in the same family ownership for over 50
years; you could say it is one of our flagships! The car was built by Dave
Spiller and Paul Spillers Grandad Harry Moore and was originally built for a
Mk VI Rochdale body in 1954 using a 1939 Ford 8hp van as a donor vehicle. In
1959 Dave Spiller sold the Mk VI and bought a partially-built Rochdale GT. The
chassis was redesigned so the body would fit and re registered in 1960. The car
then came off the road in 1965 and was put in storage. Since 1995 Dave Spiller
has been gradually rebuilding it into the fine example you see here today!
If there is ever an excuse to
dust off your magazines and look at some old ROC articles then don't hesitate
to find the story behind this beauty in the Summer 2000 ROC Magazine, No 82. If
you don't have a copy then they are available on disk or back issue from myself
for a modest fee! Sales pitch over, you should also be able to see this GT at
the Stoneleigh Kit Car Show on the Sunday and if I can persuade the Spiller
family to trailer it up to the NEC then we might be graced with its presence at
the National Classic Motor Show in November!

THE DEMISE OF A GT
This next finding came from a
previous owner who just wanted to let the ROC know about a GT he used to own, I
wish more ex owners were like this.
Ken writes: Hi. I have sent you
a picture of the car I owned in 1959/62. I sold the car to raise a deposit on
a house when I got married. I wish I had it now. The person who bought it
turned it over and it caught fire, totally destroyed but he was okay the silly
idiot. I now own, some 47 years later, a Triumph 13/60 convertible but I would
willingly trade it for a trip down memory lane by owning a Rochdale. Happy
days!
Malcolm writes:
Great to hear from you - thanks
for sending the photo of your GT! What a shame to hear the car's fate - it's
the first one I've heard of turning over, he must've been doing something
particularly stupid...
It's a coincidence that you now
own a 13/60 convertible - my first car (aged 18, in 1981) was a 13/60
convertible but my second was a Rochdale GT! I've had a couple of other GTs and
other early Rochdales since, but I'm sad to say I don't own one at the
moment.... They do turn up from time to time, so keep your eyes peeled.
I'd like to include details of
your car on our Register, even though we know it's no longer around. Do you
still have any more details of it, such as registration number, chassis number,
spec (chassis, engine, gearbox, suspension etc)? Did you build it yourself?

Ken Writes: Hi Malcolm, the car
was immaculate; I did not build it though! It was based on a 1947 Ford 10,
Sadly I do not have any more details, and it was a long time ago and many more
cars have come and gone since so I can't help.
VICTORIA CLIMAX
Below are 2 photos which were
kindly sent to Malcolm by Andy Hill, I don't think they need much presenting, I
know I've enjoyed just getting the feel from them, cracking photos!
Andy writes:
Hi Malcolm, I have some cracking
photos of the Victoria-Climax, which as you know also used a Rochdale body like
the Bristol Barb (more in the next mag). Did you know though, that Ced
requested a "lightweight" version which was like a jelly when it was
off the car as it was so thin! He also hacked the back end off to save weight
and inadvertently created a Kamm tail!
Best regards, Andy Hill
Malcolm writes:
Wonderful photos, thanks Andy!
Especially good to see the colour shot from back then; would you mind if we
used them in the club magazine?
I'm not surprised at the
lightweight shell - RMP learnt early on that they could make a nice profit by
selling a 'lightweight' bodyshell for more money than standard - and it cost
them less because it had less materials in it! To be fair, they might have used
woven mat for the Victoria Climax shell, which was more expensive than their
favourite chopped strand mat but of course much stronger... I don't actually
know of RMP using woven mat ever, though - whereas Bonglas, from whom they
bought the ST bodyshell design and moulds, always used woven mat.

Andy writes:
Yes no problem, you can gladly
use them for the Rochdale owners mag, and a credit/plug would be great for my
Classic Car Sales website! The web address is
www.victoriasportscars.co.uk
FASCINATING FORD
The picture below was also found
whilst I was surfing the net, honestly I don't spend my life on there! The
Rochdale GT in the picture was owned by Ray Kell and was listed in a Ford
Owners Club website by his son.

Ray writes:
Hi James, you sent an email to
my son regarding the Ford Rochdale I owned. I can give the following
information.
I bought the car in 1961,
selling my AJS to buy it, and sold it in 1969. The reg number was SVN 168. It
had a 1172 cc Ford Ten engine with a skimmed Ford Eight Head, twin Solex carbs
and a short straight through exhaust that exited from the nearside at the back
of the door. I fitted an external mounted oil filter and a heavy duty dynamo
and regulator. When I bought the car it was white but I had it repainted in
Ford Monaco Red and added the Ford stripes. It had electric wipers and fuel
pump from a Morris 1000. The dash was rebuilt in Formica with a glove box on
the left, switch panel in the centre and instruments in front of the Driver,
Speedo, Rev counter, oil pressure, ammeter, water temperature and fuel gauge.
I also changed the steering
column and fitted an extended one from a 105E Anglia. I also fitted a tow bar
fabricated from 2" angle. It had a split Bellamy front axle, remote gear
linkage and 15" wheels. On the electrics it had quartz headlight bulbs in
the VW lights, 3 quartz spot lights and 2 front fog lights, signpost light,
Lucas heated bar on the screen in front of the driver, rear electric wiper and
windscreen washers, manual pump operated.
When I sold it I had just
purchased a hydraulic kit for the brakes but did not get around to fit it. I
also had to extend the battery shelf as I fitted a battery from a Bedford Truck
as the normal 6v would not turn the engine over in the winter.
The car suffered two significant
problems, repeated failure of the rear axle, which was repaired by removing the
total unit including transverse spring and prop tube and fitting one from the
scrapyard. The other was blowing of the head gasket. This was solved by the
local engine machine shop drilling and tapping the block and fitting an
oversize stud in the centre of the block then torquing the head down to a
higher value than normal. I cannot remember the value but it did work. I had no
power output but did run the speedo up against the zero stop when travelling
to/from Teesside to Cardiff where I worked, and no motorways then, other than
the Doncaster bypass.
Corrosion was not a problem as
the original builder had the chassis red lead coated and the floor plates
fitted were galvanised steel. It only broke down once that I remember, and that
was a rear axle failure near Newark on the way to London, I continued down,
then back to Teesside, then fitted another scrapyard unit. The photo was taken
in 1968. Hope this helps.
I write: Thank you very much for
all the information. I have record of nearly 200 known GTs on the Rochdale
Register but yours is a new one to us! We think there were around 1350 made in
total so it is going to be a hard job trying to trace them all! Funny, my Olympic
suffered a front suspension failure in the '70s at Newark....
Malcolm writes: It sounds like a
really nice, well looked after GT, I wonder what happened to it after you sold
it? There's nothing on DVLA for SVN 168, either under Ford or Rochdale... The
registration dates from July/Aug 1958 (in the North Riding of Yorkshire),
making it (if it was registered new) a relatively early GT on the road. With a
tuned engine and 15in wheels, I suspect you had oversize tyres, because they
look pretty big in the photos, to help the gearing maybe...Do you have any more
photos? It would be really good to see better pics if possible, and to use them
in our club mag too. Do you know the names of the people you bought it off or
sold it to or any subsequent history?
Ray writes:Sorry but I have no
information on the previous owner or on the person I sold it to other than they
were in Teesside. The photo you have is the only one available, I did not take
any more. It is me in the background. You can use it in the Club Magazine if
you wish and add the limited history I have given. If I find anything I will
forward it to you. It is best to avoid the Newark area as it is not good for
Rochdales.
I look forward to seeing you all
at the AGM
James
Being set up
Or how to get the best out of your
Rochdales cornering ability.
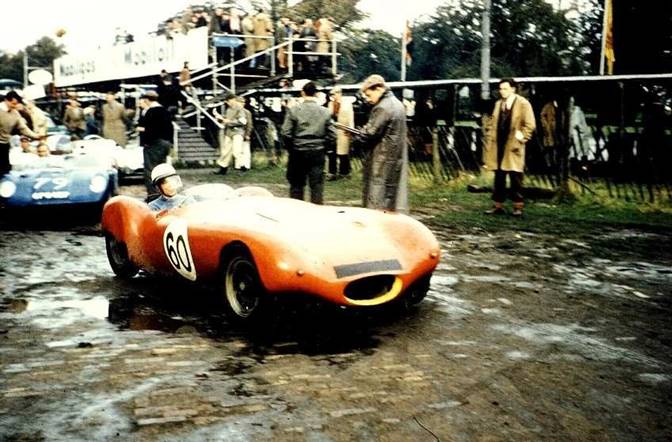
Study the photograph carefully.
What do you see? An E type cornering to perfection. The cars nearside wheels
(right as you look) are taking virtually all of the load of the cars cornering
forces, so giving the maximum grip; the wheels themselves being vertical while
the offside front wheel is just pawing the ground.
The car is neither under-steering
nor over-steering, in fact the attitude of the car shows that it has been set up
perfectly. Such settings would allow this car to be driven up to the limits of
its tyre grip and road surface adhesion. Consequently, the driver could not
gain any further cornering ability unless changes were made to such items as
the type of tyre used and width of tyre/wheel combination. If a car is not able
to fulfil the above requirements it will not be able to corner as quickly, for
the driver will be wasting time making steering and possibly power corrections.

So how do you set up a car like this?
The answer is by experimentation,
a long tedious job, but we can start by employing timehonoured methods and
pursue a logical path. The variables are the suspension geometry, the springs,
the dampers, the tyre pressures, the anti-roll bars, the roll centre height and
even the centre of gravity.
The latter is pretty well fixed
with the general layout of the car. Such items as batteries are often mounted
unnecessarily high up under the bonnet when a lower setting would be much
preferable. However, the C. of G. of the car can be lowered by shortening the
height of the springs but this will alter the rate of the spring and we can
only lower a certain amount to ensure that, for road cars in particular, there
will be no bottoming with bad roads, heavy loads or both.
Additionally, where our
front-engined cars are concerned a 50/50 weight balance is desirable and again,
a positional change of that aforementioned battery may help achieve this
balance. I have found that the local council weighbridge will allow ones car
to be weighed free of charge (not so where I live -Ed).
We are pretty well stuck with the manufacturers suspension
geometry and unless it is a car with a known history of poor handling, it is
probably best left alone. There could be a case for a change to the caster
angle assuming there is no other problem with the steering such as partial
seizure of ball joints or stiffness in the rack. Then again, if the car feels
nervous on the straight and requires constant wheel correction, or if the
steering wheel is too slow to unwind after a corner, then there is a good
chance that a greater caster angle may be required. It could be that just one
more degree would be sufficient. For track days or racing static wheel negative
camber should be set such that when cornering hard, the wheels remain upright.
For road use too much negative camber can give rise to straight line
instability so keep below 11/2 degrees.
Adjustable dampers will need to
be stiffened up a little for fast road driving and a lot for track driving but
variations between front and rear could help to get a better balance for
cornering. For example, much stiffer rear dampers than front ones could well
help to add a degree of over-steer. As to the springs, which, like the dampers,
would normally be stiffened quite dramatically for racing, on a road car, too
much stiffening would ruin the ride, so such a small required amount of spring
stiffening could probably be ignored and car tautness retained solely by the
damper stiffening mentioned above.
Tyre pressures for track use need
considerable experimentation, the aim being to have pressures high enough to
ensure there is no tyre deformation with hard cornering but not so much as to
give tyre patter which will reduce grip. I have found track pressures have
required increases as much as anything between 25-35% over comfortable road
pressures. As with dampers, fine tuning for the handling can be had by varying
the degree that tyre pressures are increased between front and rear. Too much
under-steer ?- add more pressure to the front and reduce a little to the rear
tyres.
That leaves anti-roll bars and
roll-centre height. Most road cars keep roll to a minimum with their designed
suspension geometry but press-on drivers tend to feel that their cars roll too
much. The simple cure is to fit stiffer, (thicker) anti-roll bars back and
front which will not spoil the ride qualities of the car. There is a tendency
for manufacturers to keep the anti-roll bars fairly weak. The reason for this is
twofold. Firstly, too stiff a set of anti-roll bars will cause lateral rocking
on uneven surfaces and secondly, manufacturers are happier to play safe by
giving the less experienced driver an earlier warning of danger when cornering
at speed. Some time ago I did experiments to see why my car had a tendency to
roll up to a point on entering a corner and then feel as if the roll was fully
checked. I soon realised that the anti-roll bar rubber clamps had deteriorated
and fitted a new set. This certainly improved the feel of the car but it was
not until I fitted poly bushes to the anti-roll bar did the car feel absolutely
right when turning into a corner at speed. Any change in roll-bar diameter when
you are fine tuning should be kept to a minimum for it must be realised that
roll-bar stiffness varies to the fourth power of the diameter.
The roll centre height is a
product of the suspension geometry and to alter this height would involve major
changes to the suspension mounting points, not to mention the position of the
rack and pinion. Consequently, this article cannot go into the whys and
wherefores of this specialised subject, suffice to say that road cars are
unlikely to ever need to be altered.
Returning to the issue of
dampers, it should be pointed out that they have little effect on weight
transfer during steady cornering - unlike anti-roll bars. Their only effect is
during transient motions. For example, during the period when the car is
changing from straight-line motoring to taking a curve. The increase in the
availability of poly bushes has led to many enthusiasts fitting them to their
suspensions but this has inevitably led to harshness, not a problem for race
cars but hardly acceptable for road cars With a rear live axle it is therefore
advisable with a road car to fit poly bushes to just one end of the locating
arms, using the manufacturers rubber bushes at the other end. This allows for
some compliance in the suspension as when traversing unduly rough terrain.
I'll conclude by adding that suspension
modifications can only be undertaken sensibly on a track away from todays busy
roads and with corners on circuits that can give direct comparisons of handling
with each modification. The whole issue of suspension and its setting up of a
car has to be a compromise of all the parts involved.
Derek Argyle
Changing Times
I wouldn't say that I was that
old but I do remember when drivers were fat and racing car tyres were thin. I
remember when we had service station attendants who would fill your car and
clean the screen as part of the service. Then there were the courteous AA and
RAC service patrol men who would give you a salute if you carried their badge.
The great motorcycling fraternity would always stop for another in trouble on
the road and even stop occasionally for a motorist. As relatively poor as we
were in those days we never gave a second thought to the cost of petrol though
it must be admitted that we didn't have the fuel guzzlers we have on our roads
today. How times have changed.
In my youth roads had relatively
little traffic on them and of course there were fewer roads and certainly no
motorways. Those were the days. It is still possible to find a few such roads
in this country but invariably they are in the wilds and far from southern
England. The nearest I can get to the deserted road is to be found on the
trips the Club takes to France. Not only that but what roads! Travelling on
secondary roads the surfaces are a delight; so smooth the Special feels as if
it's value is worth twice as much with the delightful ride and silence. One can
often drive for half an hour and not see another vehicle.
Car servicing years ago was not
unduly expensive and invariably one received a job well done. How times have
changed. I do not work on my Vauxhall Omega and leave servicing and MOTs to a
friendly mobile technician. On the odd occasion when I have had to take the car
to a Vauxhall dealer the work has cost me a small fortune.
One of several reasons why I
retired early was because of the bad standard of driving on my journeys into
London. Last minute cut-ins, V signs and general aggression during the morning
and evening rush hour was a situation I felt I could well do without. And so I
retired four years early and did the only thing that any self-respecting
engineer should do - build a Wildcat kit car. This abysmal standard of driving
just did not happen in my early days of motoring and there was even time and
opportunity to look at the scenery. Perhaps I am getting old after all
and should appreciate the changing times.
Derek Argyle
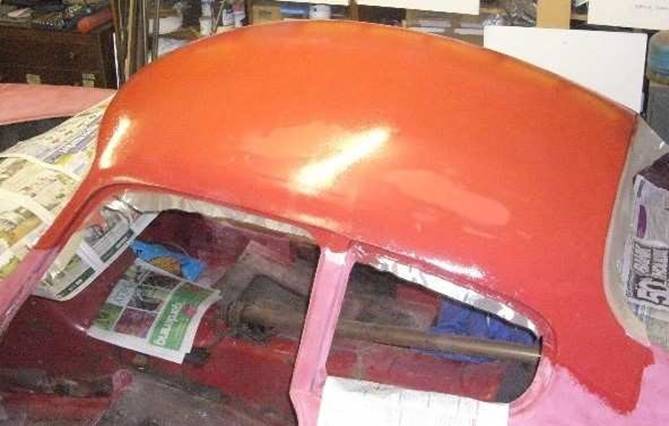
Rebuild of Phase 1 279CWD repairing the roof
Alan Farrer
Having completed the structural
repairs to the bodywork I was left with the roof. This had a good shape but
was covered with nasty looking crazing (aka cracks); either the car had had a
rollover or it had been used as a shelf during its period of inactivity. I
baulked at the thought of grinding them out and filling them individually
(wouldn't you?) and anyway there were also the usual trillion or so pinholes.�
Having spent much time wielding an artists brush and filling them individually
on my Phase 2 this was something I wanted to avoid this time round.
The accepted remedy is to clad
with tissue. I have tried this in the past and have been unimpressed by the
process; tissue is very fragile so can't be applied in large sheets and doesn't
conform to complex curves. As an experiment last year I used some fine glass
cloth I happened to have to cover crazing on the back of this car; this went
well, even though I had not really planned the process properly.� With a layer
of laminating resin applied and rubbed down the finish was quite good � and
pinhole free too.
Thus I planned the roof rather
more carefully. First of all I rubbed down the whole surface to remove old
paint and provide a good key using an orbital sander with a coarse grit disc,
then filled the few small depressions using normal body filler; even though
these were not visible they were easily felt by hand fingers are very
sensitive.
I calculated that the cloth I had
used on my experiment was about 120g/m, so something between that and the
30g/m of tissue should do the trick. Googling glassfibre brought me to East
Coast Fibreglass Supplies (ecfibreglasssupplies.co.uk) who cater largely for
the boatbuilding trade and have a very comprehensive stock. They stock a plain
glass weave at 48g/m and, even better, stock it in 1.27m (50) width, which
nicely covers the Olympic roof with 3" hanging over each side, so no joins. I
ordered 5m, thinking it would be useful to cover other areas too. I rather
feared it would be supplied folded, but it arrived very comprehensively packed
on a cardboard tube, protected by acres of bubble wrap and in a stout card
outer case. I can recommend this firm.
This is a very light cloth so is
easily damaged. I very carefully cut off 1.5m using a sharp craft knife and
laid this on the roof, which I had cleaned of debris using a vacuum cleaner
fitted with a brush tool. I smoothed it down gently by hand to get it to lay
with no wrinkles and finished off with a paint roller.
Next question: how much resin?
300g CSM needs about 600g/m, so 48g would need about 100g/m. The roof area
is nearly 1.5m, so 150g would be needed. I allowed 50g spare and measured out
200ml, forgetting resin is much denser than water, so I had plenty over! 150ml
would have been plenty. I measure resin by pouring it from a rectangular PVC
bottle which I calibrated by simple measurement, marking 100ml divisions on the
side with a marker pen crude but simple. I also measure out the hardener
using one of those tiny graduated beakers available for that purpose. 2% is
about right.
I always use pigment in my mix as
this gives a better match to the original and as a bonus indicates when the
tools are properly cleaned. I also use a roller rather than a brush to apply
the resin as this squeegees the glass material (eg CSM) with no real need for a
metal roller. A brush tends to drag the fibres, which would damage the fine
cloth I was using, another reason to use a roller. I use the small decorators
lambs wool type. Incidentally I clean the roller by scraping off the worst
with a blunt knife then, letting the roller hang vertically, pour acetone over
the end. When this starts to trickle off the bottom I hold the roller in the
bin and spin it vigorously with a stick to centrifuge the liquid off. A couple
of repeats and the roller is nearly as good as new; barring accidents (resin
has set!) a roller can be used many times.
Starting at the centre I applied
resin in a strip from front to back to lock the sheet in position, then worked
out to the sides, taking care avoid creasing the cloth (not very difficult). I
even managed to fold the cloth under the sides to seal the edges.
When it had cured I could see
that the crazes had sucked the resin from the cloth in places (I should have
been more generous). A second coat of resin fixed that problem but it did set
me thinking, so I repeated the exercise with another layer of glass, just to
make sure. It's no good having regrets when cracks reappear in a year or so,
when it's much harder to put it right. This time I used a sponge roller, as
the lamb's wool one was getting tatty, and the final finish was nearly as good
as some of my painting (says something for my painting skills). However the
sponge roller is much harder to clean so was discarded.
I would recommend this procedure
for anyone with a similarly crazed roof or other panel (I also treated the
bonnet and a crazed part of one door) it's straightforward and easy, provided
one plans the job and takes care. No more pinholes!!

48gm glass cloth in place
Resin applied
good finish guaranteed!

This
was the damaged rear that prompted the idea of cladding with cloth. Once
repaired and filled, cloth could easily be persuaded to conform to the
complex curve unlike tissue.
Stainless Steel Window Frames for the Olympic
Phase 1
Alan Farrer
Having rashly mentioned this
activity in mag 120 and having had a rare response, I felt obliged to oblige,
though Derek Bentley also wrote a very full article on the same subject in mag
82 using welded joints. Here is my version using bolted up joints.
Although the title refers to the
phase 1 the only real difference between the phases is the way the front down
piece fits to the door. In the phase 1 the down piece stops at the top of the
door whereas in the phase 2 it continues down the outside of the front of the
door. Later phase 2s also used a wider section in the aluminium extrusion to
give a much stiffer frame. However, the Morris Minor steel frames are much
stiffer still, which is why they are a popular mod on Olympics.
First find your donor frames.
These come from the 2 door Traveller; those of the 4 door are shorter about
2 too short for the Olympic, though a good welder could add the necessary
piece. Now remove all the screws and keep them for reuse, together with the
corner angle brackets (assuming they are reusable as they are not stainless
they may well be too far gone, or the screws may well have rusted in and need
to be drilled out). Strip off all the brackets which are spot-welded on. I
did this by cutting either side of each weld to remove most of the bracket,
then filing down the stubs. This is a tedious job.
Now comes the tricky bit:
re-shaping the top section to fit the Olympic. Mark your two pieces L & R
as the shapes will be a little different on the two sides. The bending can be
done cold, but much more force is required and an increased danger of buckling
than if heat is used. Also, heating enables the place where bending is
required to be better controlled.
A bending jig is essential to
avoid buckling. I made a crude jig using two sheets of 3mm mild steel bolted
together and spaced apart by a piece of chipboard of the correct thickness
(20mm). One corner of this chipboard was cut to a curve of smaller radius than
the required bend. The wood was protected from the heat by a strip of ali
wedged in place. A detachable stop was fitted to the steel take the bending
torque, so that both hands could be used to control the bend, and the jig was
mounted in a vice (see picture).
Offering the frame up to the door
aperture (with door in place), I marked the frame where the bend was to start.
I arranged this so that I did not have to cut any material from the front of
the frame, as there is not a lot of spare. I then heated the frame with a
blowlamp to a red heat over a length of 6-8" (a sheet of refractory material
behind the frame speeds things up), whacked it in the jig and gave it a heave
(gloved hands!). I had prepared a template for the required shape and got as
close to this as possible before the frame cooled (which is quickly, as it is
in contact with the steel of the jig). By offering the frame to the door
aperture I could see where adjustments were needed and repeated the process
until I was satisfied with the shape. The excess at the top rear was then cut
off at an angle to match the 45degree angle of the rear upright. Note that the
included angle is a little under 90degree. I also filled the four remaining holes
with weld, although short countersunk screws could have done the job, albeit
less neatly.
Heating the steel rather spoils
the shine, so when it had cooled I buffed the surface using Scotchbrite which
left a rather pleasant satin finish, and treated all the other pieces to match.

Bending jig crude but effective
The main reason for using the
Minor frame is stiffness so that the frame can compress the door seal over the
whole length and prevent wind noise. In the Olympic design this is provided by
two sections: the rear vertical and the centre vertical, which are welded to
the top curved piece. The latter provides no bending stiffness, since it ends
at the door, so the weld in alloy frames tends to fracture here.
In my design I decided to use a
bolted-up design to avoid welding, which makes removal easier too. Some
stiffness is lost by not welding, but by extending the front section downwards
by 6" and screwing this extension to the front edge of the door stiffness is
restored (and possibly increased). I made this extension from 2mm stainless
about 200mm long and 15mm wide so that it fitted snugly inside the channel and
screwed it to the channel using a pair of M5 CSK screws and Nylok nuts. A slot
has to be made in the horizontal top of the door for this extension to pass
through so that it can fit to the inside of the sloping front of the door. The
extension was drilled and tapped M5 at two points, one close to the top and the
other close to the bottom. By careful measurement two corresponding holes were
drilled in the glassfibre to take the screws (M5 SS, domed head, hex drive).
It is difficult to get the correct angle so that the frame compresses the
rubber seal to the right degree, but by slotting the lower hole of this pair
enough adjustment was achieved.
The two vertical channels that
guide the glass have to be spaced correctly this spacing differs by about
12mm between left and right sides. The glass shape is different too. I found
that the shape on the passenger side was a better match to the door frame, so
used two left hand glasses. First I cut the rear upright channel to the
required length, with a chamfer at the bottom to allow for the curve of the
outer door skin. I used an original MM angle bracket at the top to join it to
the top rail, though a new one in stainless steel would have been better.
In the original Rochdale design,
the rear upright is fixed to the door via two welded-on plates, one at the
bottom and one at the top of the door panel (about half way up the channel). I
did not use a top plate as the channel is a good fit in the slot at the top of
the door, which has to be widened locally to fit the MM channel. I pop-riveted
a 2mm SS plate at the bottom and tapped it M5 for the lower screw. Care needed
to be taken to prevent the pop rivets hitting the glass at its lowest position.
Getting the correct place for this screw is tricky, as the moulding in the
inner door panel is not really big or flat enough for the purpose (what's
new?). The correct angle to ensure the frame compresses the seal was achieved
by packing between the fixing plate and the moulding.
The riveted-on piece which makes
a seal to the B pillar is very similar to the Olympic version, and one could
indeed use the original, but I used the MM version. This is rather tricky; as
stainless steel is not very malleable. The lowest rivet needs to be removed,
then the sheet carefully walloped to get it to match the contour of the door
and the excess trimmed off. A single self-tapper held it down. A similar
screw (and friends) seems to have been used in the past to secure the frame to
the door; this was a waste of time as it simply worked loose in the thin
glassfibre.
To fit the front upright I
carefully measured the width of the glass, added enough to allow for the window
felt and the thickness of the channel steel, and marked the door top where the
slot had to be widened to fit the MM channel.
The required length of channel
was then cut from the original MM channel, allowing for a chamfer at the bottom
to fit the slope of the door outer skin, and an extension at the top to bolt to
the sloping piece of channel to make up for the stiffness lost by having no
weld. This was made by cutting off the sides for about 40mm and bending the
strip in a dogleg to meet the sloping piece. Getting it to fit neatly was a fiddly
job, but for a retiree like me was worth the time spent. As at the rear, there
was only a fixing at the bottom, using a pop-riveted plate tapped M5 for the
fixing screw. The original MM triangular plate which covers the joins can be
used, with a little cutting, even though it is a little small.
A note on fitting the window
winder. The inner door panel seems to have marks to indicate the position of
the four fixing screws for the mechanism. Unfortunately, this results in the
mechanism being fitted parallel to the top of the panel, whereas it needs to be
fitted so that it parallel to the top of the door; the window is then not
canted and slides properly. Slotting the original fixing holes will probably
allow enough adjustment.
Another note on the steel channel
at the bottom of the glass. This may well be rusted out, but may be replaced
with that from a MM, even though that car uses much shorter channel. Two
pieces about 125mm long will be sufficient; this is just long enough to prevent
the wheels at the ends of the arms falling out at the bottom of the travel,
provided they are carefully positioned.
A third note on window glass. It
is perfectly possible to use acrylic (Perspex) instead of glass. It scratches
more easily of course, but Derek Bentley has used it for 25 years and I used it
on my Phase 2 to good effect. It has the merit of lower weight and can be
profiled easily to get a good fit to the door frame. It needs to be the same
thickness (5mm) as the glass.

Complete
frame with corner details (inside view of drivers side) NB Chamfers at bottom
of verticals not visible in these pictures. The screw shown inset is a
bottom stop for the glass.
How I Got my Rochdale
James Wilson
After reading stories about how
other owners came by their cars I thought my story might be of some interest.
Way back in 2001 I'd decided that all work and no play was not fun, and that I
should revive my involvement with old British sports cars. I'd had a '64 MGB
and a '73 Spitfire many years ago when they were just old, used cars and not
classics. And when I first moved from the USA to the UK in 1984 I thought it
would be an ideal opportunity to get something interesting. But between
settling into my new job, buying a house, having and raising a child, moving
house and the myriad hassles of life generally that idea was pushed to the back
burner. But in 2001, it was time.
So I bought a Big Healey project
(still working on it, with another two years to go on what I'd thought was a two-year
project) and imported it from the USA. I joined the Austin-Healey Club and
went off to see the local group at a car show in Callander. And that's when I
first saw a Rochdale Olympic. It wasn't quite love at first sight, but close
There were two just sitting in the field being used for parking. I looked at
it very closely, peering through the windows and having a good snoop. But the
owners were nowhere to be seen, and the cars were long gone when I came back
from the show. The Olympic had made quite an impression on me, and I found out
a little about them over the next few years; and I irregularly followed Malcolm
MacKays column and published exploits. I also picked up a few articles about
them, but I never, ever saw another one. In the meantime, I also acquired a
Jensen-Healey (given the Healey Connection it wasn't too hard to do) in 2006
and started on a rebuild of it. Late in 2007 I thought I was finishing the
Jensen (Ha!) and could look for something interesting again and the Rochdale
Olympic was it.
I did some more research and
became very interested in getting one. I joined the Rochdale Owners Club
despite not owning one and started gathering information about them, buying all
the back issues of the Club magazine and tracking down (it's remarkable how
useful e-bay was for that, as well as a specialist book shop, or two) as many
of the articles about it as I could find. The Club gave me the contact details
of an owner, Ron Collins, in Edinburgh but I didn't pursue that any further
until January, 2008. I then felt I knew enough about them to ask
semiintelligent questions and look at one without seeming entirely ignorant;
and I felt that I could seriously speak to people about buying one in a
reasonably near future. I had earlier looked at one advertised in the Club
magazine but it was much too big a project- the front cross-frame was rotten
and the body needed considerable work. This quick look also proved that I
really needed to talk to someone knowledgeable about the cars - the big
problems I could see, but the subtle and little things to look for would need
an experts input.
So I contacted Ron, and went over
to Edinburgh to see him. We had a long talk about his car, and my assorted
automotive interests and experiences with rebuilding the Healeys and his
rebuild of his car some years previously. I was almost being vetted as a
potential owner, I felt. One thing lead to another and I soon discovered his
car had just been put up for sale. The club magazine hadn't yet appeared so I
was there before any "rush" started and we had an amicable chat about
his selling it to me, then a look over it and a very short drive; and soon
concluded a deal where I acquired his car.
I think Ron very much wanted his
car to stay in Scotland, and to be used rather than sit in a garage. We agreed
on a fair price and the deed was done. Pretty painless, and a great deal less
searching and inspecting cars and challenging projects than I'd previously
imagined. And, unlike my Big Healey or Jensen Healey, it was in good condition
except for a few minor cosmetic and general maintenance chores. Ron was unwell
at the time and has since died, but I was able to let him know his car was in
appreciative hands, and tell him of my adventures in taking it through the
Highlands and over to Skye.
I've used it a fair bit for local
drives, and for the annual Scottish Austin-Healey Club weekend tours. I think
I'll join another local club or two and try to get out more with it. It always
gets an appreciative look wherever I take it, and people just smile when they
see it. I'd like to get to the AGM, but we'll see
I've made plans for improving it
- I've already fixed a couple of minor problems, and I expect to redo the seat
covers, carpets and headliner by summers end. Next winters project is to fit
an MG Metro turbo to the 1275 BMC A engine it has, and figure out how to fit an
overdrive transmission to that. My Olympic (and other adventures) can be
followed at my website:
http://www.healeyjournal.com/pages/rochdale.html
This describes my car, what I've
been able to find out about its history, a comprehensive listing of articles
published about the Olympic and some of the books that have commentary about
it. I also show many of the promotional materials and advertisements about the
Olympic and some of the other Rochdale cars. If anyone knows of books or
articles or promotional material, I'd much appreciate they're telling me of it.
I found the idea of owning two of
the most innovative British sports cars amusing: The JensenHealey with its
ground-breaking dual overhead cam four valves/cylinder engine, and an Olympic
with its one-piece moulded fibreglass monocoque body. And the Big Healey is
one of the iconic British sports cars. It's a very small, but highly select
collection. And I'm very proud and pleased with the Olympic; and hope to use
and enjoy it for years to come.

Overlooking the Mull of Galloway,
May, 2009. The most southerly point of Scotland.

Fitting a Phase 2 Subframe the Russ Collins
way
After reading Keith Hamers
article in issue 120 of the magazine I thought I would add my two pence worth
having been through this process where many agonising decisions have to be
made. I do not profess to be an expert on suspension design but I did put a
lot of thought into the decisions that I made. I have listed these decisions
and the background to them so that others can reflect as they go through a
similar process. Remember that a jig was not available to members at the time
that I fabricated and fitted my Phase 2 sub-frame.
I first checked that my garage
floor was flat and level. I then marked on the floor a centreline with two
lines at right angles approximately where the wheels would be. I marked these
wheelbase lines at 100 mm intervals working out from the centreline. I set the
bare shell on this grid at the desired ride height. I took many measurements
to determine the true centreline of the shell but finally decided that a line
that fell midway between the outside of front and rear wheel arches was the
best compromise. At least the wheels would appear to be in the right place
from side to side. The fore and aft positioning is not critical at this stage.
I decided on a ground clearance of 140 mm at the front wheels increasing to 190
mm at the back. I did not want to fit a spoiler so reasoned that a slight nose
down attitude would help to compensate for the lift at higher speeds. It also
helped with clearances at the rear wheel arches.
The next decision was to
determine the fore and aft position of the wheels. The rear wheels are fixed
by the trailing links but I did find that I needed to pack one of the link
mountings to keep the wheels at right angles to the shell centreline. To
position the front wheels, I offered up a wheel to see what seemed visually to
be the correct position in the wheel arch. I marked this position on the floor
by suspending a plumb bob from the wheel centre. I averaged the offsets from
the wheelbase line to determine where the front wheels should sit.
After taking many measurements
off the old sub-frame I designed and built a jig to construct a new one. I
followed the dimensions of the old frame except for the fact that I did away
with the hub spacers. This meant that the new sub-frame would be wider than
the old one by the width of the spacers. This also meant that the king pin
axis would intersect the ground further into the tyre contact patch. This
should reduce the tram lining effect on the steering. Now of course you have a
sub-frame built from the clubs jig so this decision does not apply.
With ride height decided camber
will be determined by the height at which the sub-frame is mounted (the
relative positions of upper and lower wish bone mountings being fixed by the
sub-frame design). I wanted zero camber at normal ride height so did a mock-up
of the entire front suspension with wheels fitted. This gave me the sub-frame
mounting height and I made two jigs to hold it at this height. With the
sub-frame on its jigs I could move it from side to side to have the wheels
equidistant from the centreline. To fix castor angle the sub-frame needs to be
tilted to the desired degree. The castor axis runs through upper and lower
suspension pivots which (without suspension fitted) I took to be a line between
the mid points of upper and lower wishbone mountings. After researching a
number of cars of the period I decided on a castor angle of 2 degrees. I later
changed my mind and increased this to 4 degrees (still less than the original
Rochdale angle) by adding some wedges under the front of the two jigs. Finally,
with a plumb bob suspended from the notional wheel centre (marked by a screw on
the jig frame) I could move the front suspension fore and aft to position the
wheels exactly where I wanted them to be.
Having got this far the sub-frame
can now be bonded in place. This will certainly be an awkward and messy job.
I decided to plate my sub-frame and bolt it in place which gave me another set
of problems (written up in a previous issue of the magazine). My methods and
decisions will not be tested until the car is on the road but I am happy on the
whole with the way things have turned out. I hope the above will provide some
food for thought for other restorers.
* * * * * * * * * * * * * * * * * * * * * * * *
Trivia
Something you have all been
waiting for, the answer to the question: How do we know that Hamlet was worried
about getting fat? The answer is to be found in that most famous of all
Shakespearian lines: Tubby or not tubby, that is the question.
For those who failed, better luck
next time and to anyone who got the answer, commiserations, you must have the
same Christmas cracker sense of humour as me.
* *
* * * * * * * * * * * * * * * * * * * * * *
