MAGAZINE 116 WINTER 2008
Edlines
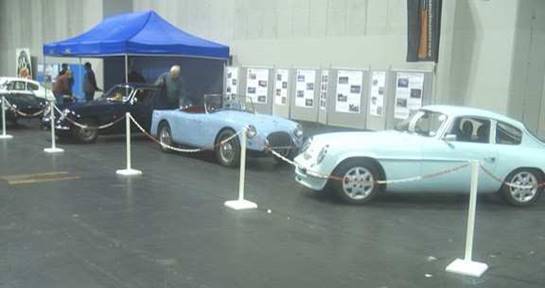
Rare Breeds Show at Haynes
Motor Museum on 8 September.
This was an excellent show with
an astounding variety of cars, including one-offs. They had a special display
of 500cc racers which gave a demo (race?) on the track in the afternoon
splendid stuff. My favourite (and also the visitors) was an Austin Ant, a
sort of mini Land Rover Defender, with a fiendishly complex transmission and
torsion bar suspension. Another that caught my eye was a beautiful SS, one that
I would have liked to take home. Definitely worth a visit - offer your car for
display next year.
NEC Show Thanks to Tony
Stanton we had a presence again at the NEC, sharing a large stand with the
Fairthorpe SCC. On display were four Olympics, two Turners and a Fairthorpe.
Sharing the stand certainly eases the workload both for buildup/breakdown and
for manning and provided a better all-round display for the visitors too. For
more details, see pp 4,5.
From the bizarre to the sublime the
Rare Breeds Show

Is
it a Batmobile? No, it's a Cooper 500cc race car!

Here
it is battling it out on the circuit

Everybodys
favourite the ADO 19 Austin Ant

A
real beauty an SS1
TONY STANTONS EVENTS PAGE
E-mail tony-stanton@fsmail.net
South Midlands Classic Car/Bike Meet No1
The second Sunday of the month in the
Winter, at Britannic Assurance,1 Wythall Green Way, off Middle Lane, Wythall,
Birmingham, B47 6WG. (From J3 on the M42 follow A435 north 1-mile turn left
at 1st roundabout then mile turn left at mini-roundabout).
Sunday 14th December, 2008. 11am
till 3pm.
Sunday 11th January, 2009. 11am
till 3pm.
Sunday 8th February, 2009. 11am
till 3pm.
Sunday 8th March, 2009. 11am
till 3pm.
Sunday 5th April, 2009. 11am
till 3pm.
ROCHDALE CALENDAR 2009
Will the members who purchased
calendars last year contact me and I will e-mail you a 2009 month by month date
sheet to stick in your calendar.
R.O.C. website
It's good to see the website www.rochdale-owners-club.co.uk
more in use again.
CLASSIC CAR SHOW 2008
After a slow start from members
offering cars and help for the club stand I thought we were in for big
problems, but after a lot of phone calls to the long time show helpers and a
few new ones I managed to get 4 Olympics (all Phase IIs). This year, to save
Derek Bentley having to walk between two stands, Andy Winston the F.S.C.C.
stand organiser and I asked the show organisers if we could have our two stands
joined together which they granted. When we had set out the cars on the stands
something did not look right, so we put the gazebo in the middle of the two
stands and mixed the cars up and spread them down the full length of the stand
(100ft); this looked really good and made the cars stand out.
I think the show for the Rochdale
Owners Club and the F.S.C.C. was a big success, I think everyone who helped on
the stand enjoyed it and we had positive response from the visitors. Now for
the thanks for bringing your cars to: Alan Farrer Phase II from nr Chichester,
Sussex, Fred Blackmore Phase II from Bideford, Devon, Collin Ellis Phase II
from Burnham on Sea, Somerset and me with DUFFY from 30 miles up the road.
Thanks also to the people who helped
man the stand: Derek Bentley, Alan Farrer, Fred and Ros Blackmore, Ron Scarfe,
Nigel Whittaker, Colin Breakspear, James Farrington, Mark Butler, Keith Pratt,
Jim Welch, Russ Collins, Roger Drinkwater, Collin Ellis, Les and Pat Brown,
Howard Evans and a special thanks to Hilary and Jane Parker who travelled up
from Bristol on the Saturday to see us. It was really nice to see you both and
the other members of the Parker family who arrived on the same day. Also thanks
to all the other members who visited the stand over the 3 days.

Photos
thanks to Mark Butler
Lost Olympics (a)
As a follow up to Olympic PII 589
CCJ in the last Magazine, I have found the advert in Motorsport April 1963 in
which Derek Argyle first bought his Olympic.
EXECUTORS MUST SELL
latest model
Rochdale Olympic
Mk. II. Practically finished from kit. Roadworthy. Cotton Tel: Flitwick (Beds.)
696 evenings only.
And the advert when he sold the
Olympic to Arthur Penman in October 1964
SUPERB ROCHDALE
OLYMPIC Phase 11, very fully equipped. 585. Details from Tel: Camberley
23324.
And also a letter in the readers
page of Motorsport March 1965 from Arthur Penman on 589 CCJ.
MOTORSPORT MARCH. 1965
LETTERS FROM READERS
N.B. Opinions expressed are those of our correspondent
and Motor Sport does not necessarily associate itself with them. Ed
RUNNING A
ROCHDALE
Sir,
I bought a Rochdale Olympic as a
result of your excellent articles extolling the virtues of the phase 1 and
later the Phase II, through your small advertisements section. Previously I
had owned nothing but Alvis-12/50, 12/60, Firefly, Speed 20 and now a
TA14-except for a Ford 10 Special which introduced me to the invaluable
rustproof qualities of fibreglass.
My keen interest in your
Rochdale reports was sharpened (and I was driven to write to you) by your most
recent article (page 119 February issue) where I found myself described as the
first chap who came along and bought Derek Argyles discarded experiment. I
am enthralled to find the history of my Phase II given in so much detail in the
discussion which you have so kindly reprinted. The car is certainly a superb
Rochdale Olympic as Derek advertised it, and I'm very glad he took it to Crown
Garage to smarten-up its road-holding, for I find it excellent except for cross
winds over Force 3 on motorways, which make it swerve slightly and prevent the
full 90 m.p.h. It is of course very different from the TA14, which goes on
motorways at 80 m.p.h. quite unaffected by wind or wet, but I was interested to
find that on a journey from Harpenden to Middlesbrough made several times with
the Alvis in 5 hours (236 miles) the Rochdale made the journey in 4hr 11min
with less fatigue.
I find that the car on average
does 31 m.p.g. and suggest that Derek got less because he had a very strong
return spring and a stiff cable on the throttle. When the pedal was depressed
considerable strain developed in the cable and linkage until suddenly the
throttle flipped open and the accelerator-pump did its deadly petrol-consuming
work. Attention to this detail enables me to move off without wheelspin
too! In conclusion may I thank Rochdale, Derek Argyle (he deserved the
profit on the re-sale) and yourselves for combining to give me a most interesting
motor car in this mass-production age of builtto-be-thrown-away tinware.
Arthur Penman
Harpenden
Lost Olympics (b)
3 months ago I received this e-mail
and some photos from David Akers in Michigan, USA, of his Olympic Phase 1 he
has owned for about 3 years. I am waiting for some more details so Derek and I
may be able to trace its history, but as it is RHD it was probably built in
this country and sent to America at a later date, so does anybody recognize the
car? More details when we know more.
23 08 2008
Tony here are some pictures of my Rochdale. It is right
hand drive. I planned to have it redone by now but no time. I plan on getting
it out of the barn this week and get the resto going. I will try to send you
some more pictures when I get it out of the barn. I would like to join the
club, I may need some parts and I am looking for a manual of some sort. The
car doesn't need much. It is a phase 1. I live south of Detroit. Close to
Ohio. How do I join and what do I get for joining?
Thanks
 David Akers
The Rochdale Riviera
At the 2007 Classic Car Show a
gentleman named Martyn Butt from Rochdale had been reading the Rochdale Motor
Panels A Brief History display board and brought to my attention under the
section about the Rochdale Riviera it stated It reputedly took its name from
the towns swimming baths. Now Martyn in his younger days use to swim at the
Riviera, but it was a privately owned open air lido in Norden about 3 miles
North West of Rochdale centre and was demolished in the mid 1960s to make way
for a new housing estate. I later found this link on the web about the Lido http://www.rochdaleobserver.co.uk/community/nostalgia/s/1029399
Then a few weeks ago a postcard of
the lido appeared on e-Bay, unfortunately I did not win the auction, but the
winner Keith Docker from Haywood nr Rochdale kindly scanned it for me to place
in the magazine.

Kind permission and copyright of Keith Docker
The End of 589 CCJ (Re-registered FWO 764C)
by Derek Bentley
I first came across this Phase 2
Olympic in about 1977 when the then owner Arthur Penman attended a talk given
by Keith Emery on the History of Rochdale Motor Panels.
Arthur had bought the car from Derek
Argyle in about 1965 and ran it as an everyday road car to and from his place
of work at the Building Research Establishment at Garston, near Watford. In
about 1982 Arthur was involved in a major accident in the Olympic to the extent
that the front was damaged back as far as the windscreen. As far as I am aware
Arthur suffered only minor injuries, but the car was a writeoff.
The remains were acquired by Keith
Emery. Keith was the person responsible for generating interest in the
Rochdale marque and the formation of a register of owners. He had acquired a
phase 1 (333 VLG) in 1976 which he sold in1979 upon purchase of a phase 2 (CAN
634C). Keith incidentally was responsible for the Olympic moulds being saved
when RMP needed to vacate some of their premises in 1977.
Back to FWO 764C. Keith had obtained
the remains and gathered together a group of fellow Rochdale enthusiasts to
dismantle the car and salvage any usable parts.
This group consisted of Keith Emery
(CAN 634C), Bernard Allum (895 GBF), Geoff Shiner (333 VLG) and Derek Bentley
(9557 LJ) The group assembled at Keiths garage one Saturday morning in 1982
and proceeded to recover any useful items.
I cannot now remember where all the
recovered parts went, although the rear hatch was in my possession until
recently (now with Alan Farrer) and the rear section was saved with the idea of
making a Rochdale shaped trailer. The remainder of the bodyshell was disposed
of at the local tip near Marlow.
Unfortunately, the trailer project
never came to fruition and that section was also disposed of at a council tip,
this time in the Twickenham area. The rear axle is still in my possession. A
sad end to an Olympic.
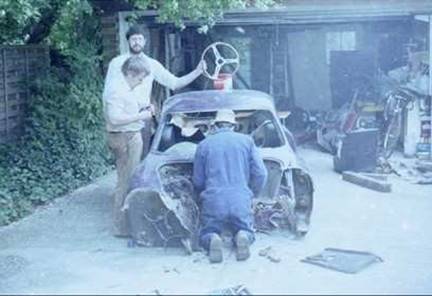
Keith (with steering wheel), Bernard (in front),
Derek (kneeling), Geoff (on camera)
Just one part of the history of 589
CCJ to find are the details of the original owner/builder, a Doctor possibly in
Gloucester and the car registered by Hereford C C. The Doctor passed away just
after building the car, it had 117miles on the clock, unfinished interior and
not been sprayed.
* * * * * * * * * *
* * * * * * * * * * * * * *
And a little note to end on
IF YOU CAN'T FIX IT WITH A HAMMER,
YOU'VE GOT AN ELECTRICAL PROBLEM.
As we have an electrical problem we
might as well throw some Lucas ones in...
While others talked about it Lucas
invented the original anti-theft device.
Lucas were also the inventors of the
first intermittent wiper, although they thought it was normal.
Lucas are also the inventor of the
self-dimming headlights and all of their headlights have a three position
switch - Dim, Flicker and Off.
And a 2nd note to end on
Tony and DUFFY wish all members a
Merry Christmas and a Happy New Year.
TOURING
EVENTS IN 2009

2nd
Annual Car Show & Rally at Disneyland Resort Paris 4-7 June [South Quay
Travel & Leisure in conjunction with Classic Car Weekly
www.southquaytravel.com/rally]
Continental Car Tours have a
range of tours available (the one to Laon being a Derek Argyle favourite)
[www.continentalcartours.co.uk].
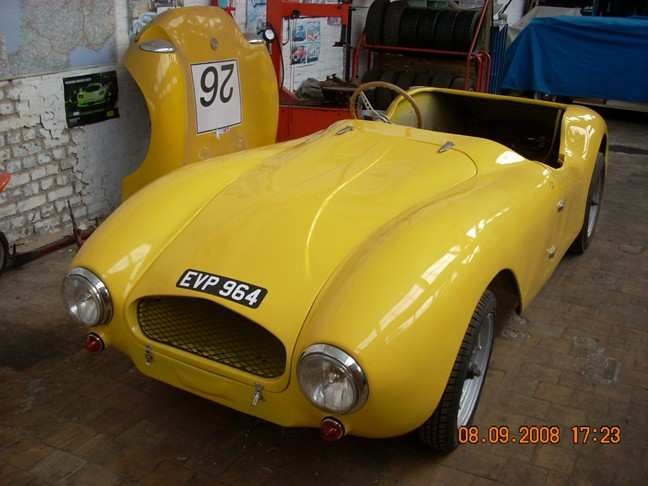
The article in Autumn 2008 about C
types that keep emerging
John Walkington
I was very interested to read the
article especially the mention of the works C type. I obtained this before I
purchased my C type body shell in 1955. The photo below and one of the F type
(MBU 303 in the magazine) were used by Rochdale Motor Panels and Engineering as
sales literature. I did see the works C type and it was a very smart car. I
remember it being a metallic pale blue and thought it had. Riley mechanicals,
but after 53 years I may be wrong.

Progress on my C type (Corsi -
which very loosely is Italian for racer)
Progress
is quite slow as I only spend about one or two days per week on it and have a
limited budget. Fortunately up to now I have been able to make parts myself or
use bits from previous cars, some even from the original Corsi, which if you
are interested appeared in an article in Magazine No. 90 Summer 2002.
Fortunately I have a very large
workshop hidden away at the end of our garden and I can just down tools and
lock up. In 1999 I got the creative urge and constructed a tubular steel
chassis to take Triumph Herald/Spitfire running gear; I modified the rear
suspension to reduce weight and increase efficiency. A
Ford Kent Crossflow with a 5 speed
box supplies the motive power, helped by twin 2" SU's on a manifold I made
and a 4 branch exhaust, professionally made and a polished stainless steel
silencer I made. I do not think the car will be very quiet. The floors,
cockpit and boot, tunnel, bulkheads and inner wheelarches are made from
GRP/polyurethane sandwich, thickness varying to suit the application. Brackets
for steering, the foot pedals, handbrake and other bits and pieces were all
made by hand and took quite a while because one does not always get it right
first time. Clutch operation was changed from Ford cable to hydraulic.
A nice big radiator was made
professionally to my specification and fits in a duct behind the grille with an
electric fan and a diverter behind to send the hot air out to the rear of the
front wheels. In 2002 the bodyshell was dragged from its resting place in the
garden - after 40 years out there it looked dreadful, dirty, cracked and bits
torn off it. It was brought in doors and allowed to dry out; cleaning and
removing the old paint to reveal the Gel coat took ages.

Tubular
chassis made in 1999

Ford crossflow engine and 5-speed gearbox

Inlet and exhaust manifolds
The Gel coat was quite badly crazed,
but a boat builder told me how to restore it. Clean it very thoroughly, flat
it down, spray with cellulose primer and flat and spray until a good surface
resulted. Before the final primer quite a lot of modification had to be done -
the door filled in, new radiator intake, new wheel arches and a moulding to
hold the windscreen. Then rubbed down and more coats of primer. Looks
fabulous now.

After 40
years in the wilderness ...

... and after refurbishment. Note lack of doors
Halfway through the above, it was
fitted to the chassis and has made a nice stiff structure. Next came the
fiddly bits, hinges and locks for bonnet and boot lids - these are concealed so
took several attempts at making them before they operated satisfactorily. The
rear lights needed pattresses to look right, so a mould had to be made first -
quite a long job as it had to be robust enough to take at least two mouldings.
A friend lent a very good brake pipe flaring tool so the brake pipes are now
ready to fit.
The next big and expensive job is the
painting - dark blue with the seats in Jaguar magnolia. The seats are by
Intatrim of Telford, beautifully made and very comfortable. I am very pleased with
the driving position. the rest of the interior will be quite stark, unlike
Corsi Mark 1 which was fully trimmed. At the moment the car weighs 9 cwt; with
only one or two additions to be fitted it will be near 10 cwt, so it should
have quite a lively performance.
The car has been as fully assembled
as far as possible, it will roll and can be braked and steered. A house move
was considered so the car needed to be mobile - ish. At the moment I am
sketching out a wiring diagram and a layout for switches and instruments.
There is no date for completion - it will be finished when it is finished, much
to the frustration of the grandchildren who are very keen to drive it.

Current
state, with proud owner
(John added the following in answer to some questions
from me Ed)
To answer your queries, the inlet
manifold is a piece of 1/4" mild steel plate with four tubes mitered to
two to support the twin 2" SU carbs, ex Rover 2000 TC and converted to 20
deg. semi downdraught to clear the distributor (parts supplied by Burlen Fuel
Services who are very helpful). The distributor is an Escort electronic with a
special side exit cap. The carbs are supplied by an SU electric pump mounted
in the boot and converted to electronic operation.
The exhaust manifold was made to my
jig by Paul at Tony Law Ltd in Leeds. They do mostly competition car and bike
work. It is artistry in pipework and fits beautifully, very reasonable in price
and Paul threw in a lot a tube for the silencer internals and for the inlet
manifold.
The clutch operation must be similar
to yours. I had an unused Rover slave cylinder, made a bracket, what else!
The release arm has a threaded swivel block on the end and a pushrod to the
slave.
A propshaft has to be
obtained soon; a local firm will make one to my drawing.
On the rear suspension, the heavy
transverse leaf spring was discarded, top wishbones in 3/4" square tube
were made and well drilled to add lightness, the inboard mounting using the six
tappings formerly used by the spring on the top of the diff. Lotus coil
dampers and the trailing links made parallel to the wheel base as the car is
very low indeed. About 1/3rd the weight has been saved and the operation
seems more efficient. As the car is so light I intend getting all the spring
units, front and rear, made to order by Dampertech.
The seats are by Intatrim of Telford,
the frames are GRP and are lighter than Richfield, also a bit cheaper. My wife
and I decided to have a day out and collect the seats, a very nice day out,
successfully getting lost in Telford. Very nice people, super product when we
finally got there, but hopeless at giving geographical directions. However,
they gave me a large piece of the fabric to make the gearlever boot and possibly
the handbrake lever boot also and any other bits I might decide to upholster,
dashboard maybe.
The handbrake lever is to the
driver's right, in the void the door used to fit; it powers a master cylinder,
to a slave below the propshaft, operating a rocker which pulls the Triumph
cable mechanism. This is sort of cribbed from C.Chapman's Lotus Mark 12 (a
Mark 10 with IRS) only he had the lever horizontal under the dash which powered
extra calipers on the inboard rear discs.
I wish to mention Wakefield Radiators
who were extremely helpful in making a very good crossflow radiator,
16"x12" with three rows of tubes at very reasonable cost from my
drawing.
The wiring is only at the drawing
stage and I need an alternator. I am about to fit the rear lights, indicators
and number plate lights. The next real big job as I mentioned before, is strip
down and paint. Probably a few brackets to make as well. (This was in
response to a comment I made that one of my least favourite jobs is making
brackets, which take a long time in relation to job satisfaction. - Ed)
John Walkington
Early
Rochdales
Once again Malcolms Inbox has
overflowed with information relating to Early Rochdales and trying to sort it
all into files on my computer requires a Masters degree in the Dewey
classification system! Two Rochdale GTs have surfaced this month and I'm sure
this is only going to be the first chapter in their very promising
restorations. Watch this space....
ROCHDALE GT ON EBAY
Ebay is a fantastic way to reach a
targeted audience and in late September this year a Rochdale GT surfaced. The
auction started off by saying we bought this car as a project but haven't got
the time for it any more ( I think we all know that feeling)! This GT is known
to the club and belonged to Alan Elliot. Although it was auctioned as a part
finished project most of the hard restoration work (chassis preparation, floor
pans, inner wings etc) had already been done. It also included telescopic shock
absorbers (this was sold as the 'Raymond Mays Fluid Cushion Ride' conversion)
and the original Rochdale radiator header tank and crossflow radiator. The car
also came with a very good, highly tuned aquaplane engine. The car does not
have any registration papers or original registration plates these were lost
during the long time that it was off the road awaiting restoration in the
1970s/80s/90s.
The winning bidder of the auction is
Tony Hansford; he writes:
I have recently acquired a Rochdale
GT from Alan Elliot in need of extensive restoration, I believe you know this
car? I run a restoration/race car preparation business in the south of England
and I intend to restore the car back as a race car, and would like as much
period information as possible. Also I would like to trace the original
registration number for the car, and I believe Alan has spoke to you about this
in the past.
I enclose a couple of pictures of the
car at the moment and also of the kind of cars we prepare and race; as you can
see the Rochdale is a million miles away from what I have raced in the last few
years, but I have always liked the cars, and want to build a gorgeous 50s
supercharged Rochdale, so any info would be gratefully received.
Malcolm replies:
I'm delighted that Alan's GT has gone
to such a good home and will be rebuilt and raced - that's brilliant. What race
series are you aiming at? I think what's permitted will depend quite a lot on
the regulations. As to what was done in period, again it depended on the race
series - 1172 Formula was quite strictly regulated but that was for lightweight
racers anyway, not cars like the GT. Allan Staniforth (the race car suspension
expert) used to race a GT which he'd modified quite heavily to use BMC running
gear.
Certainly the overhead inlet valve
conversion and supercharger are period items, so you should be able to use them
in pretty much any current historic sports car racing. They can be hard to
find, but asking around the racing fraternity is almost certainly the best way
to track them down - someone, somewhere, will have them. I think Gerry Marshall
did - certainly he had a 100E that he was planning to rebuild as a race car and
he introduced me once to a guy called Spike who had built the Willment OHIV
conversions... Quite a few of the people who used to play with sidevalves are
still about, and I'm sure some of them have parts squirreled away in attics
etc...
There were also many period items
produced to improve suspension on these cars, and these are well worth having.
Independent front suspension makes a huge difference, along with telescopic
shocks (which I think you already have?). Close ratio gears in the gearbox and
a high ratio crownwheel and pinion, along with Ballamy 15 inch wheels, also
transform the car's potential.
I'm sorry I can't give you any more
help on the history of the GT, as I know no more than what Alan has told me.
Your best bet is to keep gently chasing Alan and Mick, to see if they can put
you in touch with previous owners who might have some more information. Come
back to me if you get anywhere?
Tony replies:
Thanks Malcolm,
I'm not
sure what race series it will be raced in, and whether I personally will get
time to race it, as I'm very busy with racing my F1 cars in the Euroboss
series, I've attached a couple of pictures, as you can see a long way from
1950s kit cars but I've always liked Rochdales, especially the early ones, so
if you hear of any period parts for sale could you let me know please? Also any
period pics of GTs that may have raced will be a big help, do you have any?
Also specs of what was done, as I'm trying to research before we start the
rebuild.
We're sure this is going to be a very
special GT when it is completed.
ST REBUILD CONTINUES
Patrice Wattinne has sent a photo of
his Rochdale ST. Patrice says this is the last photo of my ST before I drive
it to a man to get a new windscreen! He is planning to get a low wraparound
Perspex screen with central divider/support, which in a way echoes the original
split screen (though higher, with glassfibre surround) that Rochdale used to
supply as an extra. We look forward to more photos of this stunning restoration
soon.
BREWERY GT TURNS UP IN FRANCE!
A Rochdale GT 263 UXG, previously
registered 55 FAU was won on an Ebay auction by J W Lees Brewery of Manchester,
who were going to use it for promotion and give it away as a prize. Eventually
they seemed to lose interest in the idea and the car became homeless!
It now seems that the car has turned
up in France and has found a new home and owner! From the pictures below you
can see that the restoration of this car is very professional and the final
product is going to be a first class Rochdale GT. Hopefully we will gain some
more information about this restoration soon. Watch this space!
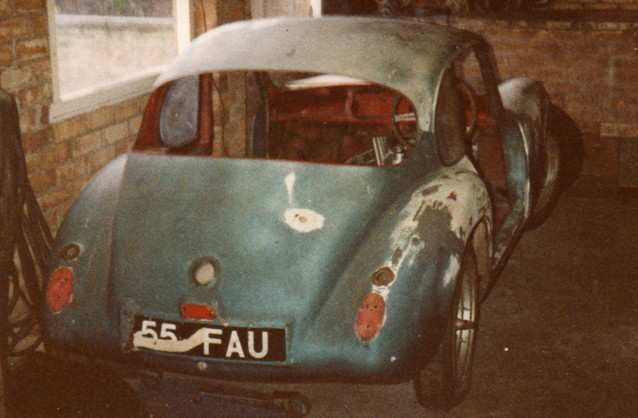

Before and
after


Before and
after
A MATTER OF ALIGNMENT
Les Brown: (in a missive to your Hon Ed)
You are working on your Phase II in the garage -
probably gel cracks, or something - when your mobile phone rings. Putting your
sanding block on the roof, you gently lean on the rear of the car with one
hand, while answering the phone with the other. Does the rear of the car:
(a) depress smoothly and silently, rising
back to its full height as you remove your hand? (b) stick initially, moving
down with a crack and a groan, remaining down as you stand up, or (c) not move
at all?
If your answer to the above is (b) or
(c), this piece will probably be of some interest!
Regular readers will recall my
earlier efforts to get a decent ride from my Phase II. We have all read those
glowing 60s tests describing a smooth and easy-riding car, very much against my
early experiences of an unbelievably harsh ride. Had it always been like that?
Difficult to say, and questioning original owners tended to bring a well, what
do you expect from a 60's sports car? Careful tweaking of a number of details
resulted in definite improvements, but still didn't fully match expectations.
Tracking down the exact cause wasn't easy, and the rear suspension has a number
of unique design points which it is easy to blame, including
1)
The rear dampers. With their stem-stem mounting, this was my
initial favourite. Was this able to cope with the varying angles that the
trailing arm subjected it to? AVO didn't like the idea, quoting Marcos as the
only other users of such a system, and they weren't renowned for their ride.
Was the heavier build not allowing as much flexing as earlier ones had? Using
the earlier mounting rubbers and not over-tightening helped a little.
2)
Accuracy of the rear arm construction. This clearly wasn't good,
and my earlier smoke-and-mirrors tests resulted in me welding small wedges
around the seat for the damper, to straighten the angles up a little.
3)
Seating of the spring straight onto the body at its top means
that the forces by-pass the mounting rubbers. Also, with the changing angles
of the damper, the fixed position of the top mounting is bound to generate odd
forces within the spring - enough to snap one of mine in two places near the
top after only about a years use (and wreck a brand-new AVO!). AVO did
recommended trying a shorter spring with a top collar for mounting on the
damper to improve this situation.
4)
Unsprung weight - I have heard this one brought up many times.
The actual mass of the sprung components isn't that bad, but because of the
Olympics very light weight, the ratio of sprung:unsprung masses is less
favourable than on many cars. The downward forces from the rear spring that
encourage the rear wheels to track a bumpy road surface are exactly the same as
the upward ones fed into the body structure at its top. Heavy unsprung weight
= more difficulty in controlling the suspensions motion and light sprung part =
greater vertical accelerations being felt by the body and its occupants. Which
is why the cars should ride better two up, and vans/estate cars have a harsh
ride when unloaded. (more mass to move means less acceleration for the same
force - Newton and all that). And presumable why you went to the trouble of
mounting the diff on the body of your latest car, Alan? But I can't really buy
it for the levels we are discussing, and it would not cause effects (b) and (c)
detailed above, anyway.
5)
Tyres. Because they are so light, and most cover low mileages
Olympics don't tend to wear these out as fast as other cars. We're all pretty
tight as well - one of the reasons we are attracted to the car in the first
place - so it's difficult to throw away tyres which appear sound on the
outside. Well, they may not wear but they DO harden with time and it was only
by replacing an apparently sound set of ZXs in the early days of ownership that
my car became driveable at all.
By sorting the above considerations,
my answers had moved from (c) to the good end of (b), still without entirely
impressing, so road damage to the bottom of (yet another!) set of AVOs
encouraged me to press my spare suspension/axle into service while I was at
it. Laying all the parts out just prior to installation led to much head
scratching. It all looked so good - far better than most 60s efforts - surely
it COULDN'T be so badly flawed? And so it proved.
I fitted the new trailing arms to the
body, using their original silentbloc bushes (didn't fancy another replacement
job unless I had to) and positioned the arm at about the mid position of the
suspension movement as I tightened the nuts (tighten at the bottom and there is
presumably a limit through which the rubber bushes can stretch?). Would the
back of the arms line up with the axle mountings? Well, not entirely, and some
pulling in would be needed to fit the axle - but would the bushes allow for
this?
Worse was to follow, as I rested a
small steel bar in the rear (axle end) bush of each of the arms in turn. They
were miles out! Each was perhaps 10 degrees or so from being level - and angled
in opposite directions. How could the bushes cope with such mis-alignment? I do
like these silentbloc things, and have the fondest memories of my Greeves
suspension (two wheeled equivalent of the Rochdale? - well, pretty near) which
did away with metal springs entirely and relied on the torsional forces
generated within the mounting rubbers as the front suspension medium (and on
some, the rear also). Unlike the Rochdale application, these had always been
super-smooth in their operation, and vastly superior to the telescopics of the
time. But there is a limit to how much can be reasonably be expected - pulling
the arms in AND putting a twist on each as well - no wonder the car had ridden
so badly. Worse still, just think of the path the arms were attempting to
follow as they compressed the springs - each would try to move in to the centre
of the car and the various parts would be fighting against each other as the
suspension attempted to move! Well, I'm sure I'd have creaked and groaned,
under the circumstances.
I took the arms off again, along with
the little square brackets that held them in place. Now, I had always admired
the design of these bits - they take what is basically a point loading
situation and spread this into three large bolts, positioned in three different
planes at a point on the car well suited to take out both the horizontal forces
(floor) and vertical (rear bulkhead). But it's no use doing all this if the
holes don't line up! I went back to original owner, Dave Collings and asked if
he could remember how the car was delivered, all those years ago. He didn't
think it came with ANY drillings done, and remembers the engine mounts as being
a real **** to line up. And there were, of course no sets of instructions
given out with the car (musn't upset the taxman - we're only selling you a pile
of parts) so is it any wonder some have been riding so badly for so long?
The main problem seems to be in the
actual moulding of the body and the bracket has a natural tendency to sit at a
slight angle as a consequence. Were all Ph IIs the same? How could any of them
ride properly? But what to do? I had re-made the squares myself as the
originals were pretty grotty, with the axle bolt going through at 90 degrees to
the vertical surfaces - could I file the outer holes to bring the bolt into
its correct alignment? This seemed the easiest option and I enlarged the hole
into a slot before going back and welding up the original part of the hole. So
far so good, but far more filing was involved than I had thought possible, and
the outer holes ended up a good quarter inch from their original positions,
with horizontal displacement as well to help match the rear of the arms up to
the axle. When reassembled I found that the front silentbloc was now at quite
an angle to the bracket, resulting in poor seating at each end - I filed both
ends of the bush's inner sleeve at a slight angle, to line it up better,
tightened everything up - and prayed!
Would the ride of the car be
improved? Well no - it wasn't improved, it was absolutely TRANSFORMED. This
one simple mod had resulted in more improvement than all the careful tweaking
that had gone before - we were definitely firmly in (a) territory, for the
first time ever. I couldn't believe it! My first thought was - crikey, this
is better than the Mazdas wishbones - it wasn't, but careful backto-back rides
revealed there wasn't that much in it and the ride from the rear was certainly
better than any of the 1960s cars I have owned/sampled.
So, here's my final thoughts on Phase
II rear suspension after all those years - I only find out these things when
I'm about to sell the car (just so much room available, folks!)
i)
There's nothing wrong with those dampers - maybe not even the
much-maligned SPAX which I know have worked very well on other cars.
Similarly, the springs top mounting to the body is OK if everything is set up
right - perhaps this was to allows a longer travel in the first place. Also,
unsprung weight, though important, is a bit of a red herring in comparison with
other issues here.
ii)
Tyres are still important, I run Michelin MXs with a pressure of
20psi - does anyone ride softer than that?
iii)
I have kept to original bushes were possible, those that come
with the AVOs feel a little harder than the ones I am using. Don't tighten
rubbers too much, and watch out for the massive washers that AVO give you -
they can rub on the bolts at the top mounting point, sounding like a car full
of canaries when you go over a bump!
iv)
Accuracy of the arm construction can be dodgy and I bet most of
those in service weren't made in Rochdale! Keith Pratt published a diagram a
year or two back (Winter 2002), which is quite instructive to re-visit. Would
it be worthwhile for the club to get some arms and brackets made up accurately?
I wonder just how many Olympics have been forced off the road (and kept off!)
by issues like this.
v)
The poor alignment of the arms can be tackled directly by work on
the body. The inner mounting surface can be brought to the vertical, on each
side by building up with fibreglass, and filing to suit.
vi)
Alternatively, cut the outer (vertical) face of the bracket off,
weld an appropriate circular wedge to the inner before tacking the outer back
in place and checking alignment before re-welding. This enables the outer
surface to be correctly vertical and obviates the need for filing the bushes -
a bit of a bodge, if we're honest! If you elect to make new squares (not that
difficult) note that they should have well rounded corners to enable good
contact with each of the surfaces - those on my car were horrible! The long
axle bolt must be both horizontal, and at right angles to the centre axis of
the car. I always use the biggest washer I can find for the fibreglass side of
these bolts.
vii)
It's worth checking the accuracy of all other parts used. I had
two Panhard rod/back axle brackets, one a quarter inch longer than the original.
This effectively lengthens the rod, and has enabled the axle to mount up nearer
the central position it is supposed to adopt - worth playing with, if yours
sits to one side (!)
viii)
My springs are 130lb/inch items from Demon Tweeks, and the dampers
are set to position 2 (out of 17). It's certainly soft at the rear - the front
is now noticeably harsher. It may be worth experimenting with a little more
damping - 3 or 4 - though it's a bit of a faff to get at the adjuster inside
the arm every time. Incidentally, I always smother these bits in copperslip -
come back a year later and you'll have no chance with the spring height/damper
adjustment if you don't.
ix)
Lastly, what does that bottom quarter inch on the damper rod
achieve? It sits at the very worst position possible, and is vulnerable to
bricks/stones etc. I don't even remember clouting mine, but something had
knocked it right back, and replacement came to the full £140 for the pair. It
has flats to grip when you tighten the nuts, but the adjuster only just fits
inside the arm, so no way can it twist as you tighten or slacken the nuts
anyway. I'm also tempted to fit a little skid plate to the bottom of the arm to
protect the remaining bits that protrude under the arm for a little better
ground clearance and less vulnerability overall.
Following our discussions, Alan, I
was interested to hear that a number of cars only use TWO bolts - the front and
the top - at the rear mounting point, with the long axis bolt not passing
through the body at all. I dredged back through my back issues of the mag -
what great stuff there's been over the years - and it's remarkable, reading the
letters/articles just how much trouble there has been centred around the rear
suspension on various cars.
I found two references - Christmas
'92 (John West) and Winter 96 (Paul Lyon) referring to the repositioning of the
long bolt so it doesn't pass directly through the body. I have to say, it's
not an idea I'm keen on! Introducing point loads into a fibreglass structure
can be scary unless carefully handled and we have all seen evidence of local
cracking round door handles, hinges and mounting points where loads have not
been spread over a wide enough area.
The one vital issue for this mounting
is that the axis bolt must be located firmly and accurately to the body
structure - bolting it directly through the body is an excellent start, and the
other two bolts do a good job in stabilising its mounting in the other two
planes as well as distributing the loads generated to the rest of the
structure. While I am sure it IS possible to beef the area up enough to cope I
do like the way the three bolts work together in each plane, and the shear
loadings the long bolt introduces directly to the fibreglass in both horizontal
and vertical senses must make a major contribution to the overall stiffness at
this point.
I wasn't too surprised, therefore
that Pauls 1996 findings were of a failure having occurred after someone had
reduced the number of bolts to two. I favour playing safe - it's just a pity
the original Rochdale didn't do as good a job with the alignment as it did on
structural strength at this point. Perhaps it's the very trickiness of this
joint that has led to all the alignment problems over the years?
Les Brown


Olympic Rebuild update
By Jason Hoffman.
Just an up-date on the restoration of
my Olympic phase 2 [ PAX 44]. After buying the car and getting it back to
Keith Hamers workshop, we gave the car a good looking at and as is normal the
car was stripped to a bare shell. First jobs were to fill all the holes made
by the previous owner and reinstate the rear wheel arches, which had been cut
out to help with problems of the tyres rubbing. The fuel tanks had leached
their resin and I want a car that will be reliable. So I've fitted a steel
tank mid-ships behind the rear axle, moulded into the floor; the spare wheel
will live inside. Then I fitted a roll cage, partly bonded into the shell to
give me good seat belt mounts and help when the car hits the track. The front
suspension is Minor based as a phase one and is now getting cleaned and powder
coated as the back has been. I'm trying to get the car back to being a rolling
shell before I tackle the doors, possible the biggest job on the car.
Here are some pics of my phase 2.
Didn't take too many - just enough to see what's going on. You can see the
roll cage is a four point fixing but also bonded into inner wheel arches.
Behind the cage is the new battery box, where the fuel tanks used to be.
Opposite to the battery will be the fuel pump and fuel filler pipe with the
tank directly behind the horizontal cage come seat belt tube. The back
suspension has been stripped, powder coated and re-fitted, using club supplied bushes
and new Spax shockies that came with the car. The rear wheel arches have been
reinstated using sections cut from an old Rochdale body. In the engine bay
I've filled lots of holes and when I've had a little resin left over from
repairs I've brushed it on the bay so it can be made smooth enough to paint.
Front suspension has already been stripped I just have to clean all the glass
fibre up so it can have a dusting of paint, then it's the doors which I think
will after they are finished, I could need psychiatric help.


FROM THE FBHVC
FUEL
The Effect on Specific Gravity of Blending Ethanol into Petrol
Matthew Vincent
Petrol metering systems in general
are affected by the specific gravity of the fuel, and we have been asked this
question in connection with autovacs. Devices which employ a float as part of
the mechanism to control either the pumping or metering of fuel are likely to
be affected by changes in its specific gravity, or density. Ethanol added to
petrol is usually about 96% pure ethanol and 4% water. The density of pure
ethanol is 0.789kg/litre. Allowing for the presence of 4% water (SG 1.0;
density 1kg/litre) will increase the density of the fuel ethanol to
0.797kg/litre.
Petrol in the UK is sold under the BS
EN 228 specification which permits the density of the fuel to lie anywhere
between 0.720 and 0.775kg/ litre. This flexibility is necessary because petrol
is not a single substance but is made up of many different hydrocarbons,
depending on crude oil source and the configuration of the refinery producing
the fuel. Density may also alter during the year as a result of blending
changes needed to produce fuels of different volatility for winter and summer
for example. There is thus a considerable range of fuel density, but in
practice most petrol will have a density lying in the range 0.735 to
0.76kg/litre. For the purposes of this simple analysis, a value of
0.745kg/litre will be assumed.
Adding 5% of ethanol by volume (5.35%
by mass) to petrol will raise the density of the blend by a small amount, i.e.
about 0.4% from 0.745kg/ litre to 0.748kg/litre. This change is clearly well
within the normal range of variation in density which is permitted by the EN
228 specification, and in truth is unlikely to make any significant difference
to the operation of fuel metering or pumping systems.
Where more ethanol is added to the
blend, for example 10% or 20%, changes in the density of the fuel will be more
noticeable, increasing linearly in proportion to the added ethanol, although
such changes are still relatively small. However, at these higher blends,
other aspects, for example fuel volatility, or effects on the materials of
construction of the fuel system, are likely to have a more noticeable effect on
operation than fuel density changes.
Conclusion
Addition of small amounts of ethanol
to petrol will make a small but measurable difference to the density of the
fuel. However, the difference in density corresponding to the addition of 5%
ethanol by volume into petrol, estimated at about 0.4%, is considered to be too
small to make any significant or noticeable difference in vehicle operation.
Permitted variations in density in petrol derived from crude oil are
significantly greater than changes caused by addition of ethanol to petrol.
Aspects
of the use of petrol containing ethanol
Based on a recently published public domain document,
CONCAWE Report number 3/08
Fuel volatility
Blending small amounts of ethanol (up
to 5%) into petrol does produce a measurable increase in volatility. Oil
companies must ensure that fuel volatility meets specified limits (EN 228) so
petrol containing ethanol will be adjusted to this specification. However, if
fuel containing ethanol is mixed in the vehicle tank with purely hydrocarbon
fuel an increase in the volatility of the blend in the tank can result. This
may produce unwelcome symptoms of poor hot starting, erratic running including
running too rich, or too lean, associated with excessive fuel volatility. The
FBHVC caters for a wide range of vehicle ages, and it is highly probable that
some will be less able to cope with an unintended increase in fuel volatility,
and also some time-related deterioration in performance of cooling systems.
Unfortunately, it seems that not all
fuel containing up to 5% ethanol is labelled as such, so the scenario of mixing
two types of fuel in the vehicle tank is a realistic one, with a significant
probability that driving difficulties may result. Volatility related problems
have been discussed before, and there are a number of often fairly simple
remedies.
Octane quality
The addition of 5% ethanol increases
petrol octane quality by about one octane number. For this reason high octane
unleaded petrol (nominally 98 Research Octane Number or RON) is more likely to
contain ethanol than the normal 95 RON standard or Premium product. Refiners
do not like giving quality away, so if ethanol is added to the standard
product, the blend may be adjusted so that octane quality remains at 95 RON.
Those owners of high performance cars originally requiring high octane five
star petrol are more likely to buy 98 RON unleaded, so they are more likely to
encounter blends containing ethanol. However, given the high octane quality of
ethanol, and the EU-driven enthusiasm for bio-fuel inclusion, use of ethanol in
the normal 95 RON unleaded petrol cannot be ruled out. Exposure of the
majority of historic car owners to blends containing ethanol is increasingly
likely as time goes on.
Effects on fuel system metals
Briefly, the presence of ethanol in
petrol increases the risk of corrosion of metallic fuel system materials. This
difficulty is recognised from long experience, and effective corrosion
inhibitors have been developed. Responsible fuel retailers should employ a
suitable additive to protect their customers treasured possessions, but this
may not always be the case. CONCAWE Report 3/08 gives a list of metals not
recommended for use with petrol containing ethanol which reads like a metal
who's who for vintage and classic cars, i.e. zinc, brass, copper, lead-coated
steel.
On this basis, the type of car
favoured by those represented by the FBHVC could have problems in the petrol
tank, fuel pipe, carburettor and most fittings. Modern vehicles have tended to
maximise the use of engineering plastics, so will have less of a problem.
However, to avoid sounding too gloomy, it should be remembered that corrosion
inhibitor additives are usually very effective in providing protection, and if
the products used by the fuel retailers do not perform, a low cost after-market
product may well become available for owners of vulnerable vehicles to use.
Effects on seals, plastics and other materials
Other no-no materials mentioned by
Report 3/08 are shellac, cork, nylon and GRP materials, plus various elastomer
and seal materials. Recommended materials include Viton, Fluorosilicone,
neoprene and Buna-N for hoses and gaskets (but neither of these for seals).
Teflon tape is recommended in preference to alcohol based pipe and thread
sealing materials. Tank lining materials used to prevent small leaks in tanks
are also in the not-recommended category for ethanol fuels. This is consistent
with a report received by the FBHVC this summer from one owner who had treated
his tank with a proprietary sealing product, after which fuel containing
ethanol had been used, resulting in a proverbial gooey mess. The scale of the
problem in this case led to the need to strip the fuel system. It is not
currently known whether tank sealant manufacturers are able to supply products
compatible with fuels containing ethanol, but their availability would
certainly be an advantage. If such products are not available, their use is
likely to decline and rather more traditional methods of tank repair, or even
re-manufacture, may become a growth industry.
Effect on gums, sediments etc.
Over time all fuel handling systems
tend to accumulate deposits of one kind or another in crevices and corners.
Sediments, gums, rust, lacquer and other materials fall into this category, and
generally the older the fuel system the more of such material there will be.
Unfortunately fuels containing ethanol tend to loosen these deposits which then
move on to plague the driver with mysterious fuel starvation problems.
There have been a number of
references to such problems recently, including in cars used for racing, which
arguably may be more likely to be using fuel containing ethanol through the
high octane route. Irritating though this problem must be, there is arguably a
finite amount of such material in fuel systems, and thus after a certain time,
which will be shortened by thorough cleaning, further use of ethanol fuels will
not dislodge more sediment to block filters or jets, so hopefully this problem
will fade with time.
Fire safety
Fuels containing ethanol at low
levels (5-10%) behave very similarly to those not containing ethanol when
burning, so safety considerations and fire-fighting techniques will be similar.
However, high ethanol content fuels have been shown to be capable of
de-stabilising or collapsing foams used to fight fuel fires. Also, pure
ethanol burns with no visible flame so making fire fighting more difficult.
Alcohol resistant fire fighting foams should be used with fires in fuel
containing more than 10% ethanol, but given the difficulty of knowing what sort
of fuel blend is in use in certain older racing vehicles, this type of foam
would be a wise choice for all racing applications.
In conclusion, there are a number of
unfortunate or negative aspects to the use in older vehicles, of fuel
containing even 5% ethanol. These can be summarised as: an increased tendency
to vapour lock, fuel system corrosion and random fuel starvation events from
dislodged deposits. These potential problems in general would support the view
if in doubt avoid. Unfortunately it seems increasingly clear that it will
become harder and harder to do this, so that perhaps inevitably such fuels will
become just another part of the picture of using a historic vehicle in todays
world. Experience is being gained all the time, so maybe a clearer picture
will emerge with use. Historic vehicle owners should be aware of potential
pitfalls, as they may be able to take precautions, or may more easily find a
suitable remedy for problems which do occur.
CASTROL
CLASSIC OIL WITH ZDDP ANTI-WEAR ADDITIVE
In response to a question about oils which do not
contain zinc dialkyldithiophosphate Castrol Technical Centre very kindly submitted
the following article.
Established in 1899, originally as
C.C. Wakefield, Castrol launched their first lubricant for cars in 1906 and
have been at the leading edge of lubrication technology ever since. With the
introduction of low viscosity engine oils and changes to anti-wear additives in
modern oils in recent years, owners of veteran, vintage and classics are asking
whether modern oils are suitable for their cars.
Choosing the correct lubricant for
your veteran, vintage or classic vehicle is essential to ensure peak running
and maximum wear protection. The technology of older vehicle engines is very
different from today's modern cars, so to assist owners, Castrol reintroduced
their older brands with their Classic Range in the early 1990s.
These Classic oils are produced to
original viscosities and importantly have retained the necessary levels of
additives including anti-wear additive ZDDP (zinc dialkyldithiophosphate)
appropriate for the technology of the engines they are designed for and to
provide overall protection. The ZDDP levels are appropriate for engines that
are in use or running-in, including those fitted with new or reconditioned
components, where care should always be taken to follow the manufacturers
recommendations when breaking in new components such as camshafts. ZDDP
additive provides a high level of antiwear protection, but its phosphorus
content is harmful to catalytic converters and other emission equipment fitted
to many modern vehicles. It has therefore been reduced in the latest
specification oils, designed for engines using the latest surface hardening
technology and meeting the latest emission requirements for modern vehicles.
These requirements also necessitate the use of other new emission equipment friendly
additives not designed for use in veteran, vintage and classic car engines.
Oil formulations required for todays
modern vehicles are very different from formulations needed for older vehicles,
having thinner viscosity and alternative additive technology as stated earlier,
making them generally unsuitable for use in older engines. This has been done
in conjunction with new vehicle manufacturers who have increased the surface
hardening of engine components to receive maximum protection from the new
additives. Oils for modern engines comply with the latest API ratings and are
designed for modern engine technology with tight tolerances and compatibility
with catalytic converters.
A car engine of old design has very
different characteristics, with cork, graphite or rope seals, low pressure cog
driven oil pumps, wider oil-ways with greater dependence on splash and
cling lubrication, lower revving with lesser machine tolerances. Such widely
different specifications demand totally different lubricants of thicker
viscosity with appropriate additives specially included for the work they have
to do. Oils even of the same viscosity, supplied by different oil companies
can have radically different formulations and thus have significantly different
performance characteristics. Oil classifications are designated S (for spark
ignition petrol engines) and C (for compression ignition diesel engines).
Oil classifications for older petrol vehicles range from SA for vehicles from
the turn of the last century to SH, to the late 1980s and early '90s.
Inadequate
anti-wear additive (ZDDP) and the oil film between moving parts breaks down
prematurely, resulting in metal to metal contact and damage to reground or new
engine components particularly on run-in.
Inadequate
detergent will result in gum and lacquer clinging to the hotter engine
components.
Too
much detergent can cause a build-up of metallic ash in the combustion
chambers of older engines. In older engines with traditionally high oil consumption,
this will cause detonation and pinking. In older engines where the carbon has
built up over a number of years the detergents can also have a scouring effect
causing the carbon to flake off, blocking up oil galleries and spray jets.
High levels of detergent will wash traces of carbon from seals and gaskets,
revealing oil leaks.
Inadequate
anti-oxidant and the oil will permanently thicken during high temperature
motoring, with large amounts of gum and varnish clogging filters and piston
rings.
Inadequate
corrosion inhibitors and engine internals become pitted with corrosion and
rust from acids and water formed during combustion.
Inadequate
dispersing results in soot, wear metals and the by-products of combustion
settling out in the sump to form a thick sludge that will block filters and oil
ways.
Inadequate
pour point depressant and the oil ceases to flow at low temperatures, with
excessive strain on the oil pump or in certain cases, oil starvation on
start-up causing complete failure of the lubrication system. For older
vehicles; veteran, vintage and classic, use an oil of the correct viscosity as
recommended by the vehicle manufacturer and shown in your vehicles handbook.
Where your vehicle requires a specific viscosity such as 30, 40, 50 and 20w-50,
avoid using inappropriate low viscosity engine lubricants designed for modern
vehicles such as 0w, 5w, 10w, 15w. Castrols vehicle lubrication records date
back beyond the turn of the last century, detailing lubricant specifications for
engine oils, gear oils and greases right through to today's classics, so to
find out which Castrol grade is right for a vehicle, owners can simply refer to
their vehicle handbook and select that grade from Castrols Classic range.
Castrols Classic engine oils XL30, XXL40, GP50 and XL20w- 50 are formulated to
the original viscosities and contain the necessary levels of ZDDP anti-wear
additive to provide appropriate protection for veteran, vintage and classic
engines. The range is available throughout the UK via leading car
specialists.
Castrol Classic Oils Wakefield House, Cambridge CB24 4QZ
Sales & Technical Help-desk 01954
231668 email sales@classicoils.co.uk Website www.castrol.com/uk/classics
OLYMPIC REGISTRAR
Olympic Phases 1, 1 and 2 a clarification
There would seem to be some confusion
as to the various types of Olympic shells produced by Rochdale Motor Panels,
which I will attempt to clarify. In particular I will dispel the erroneous
Phase 1 description applied to some shells.
The prototype Olympic was constructed
around Morris Minor components, which the company thought would become the new
special builders car and take over from the Ford E93a components generally
used in the GT and Riviera.
The first production shells differed
from the prototype mainly in the upper areas with a larger glass area and
purpose made windscreen. The prototype incidentally did not use a
Morris Minor windscreen as has been previously implied. Looking at the
photographs I suspect that it was actually the rear window from the Austin A55
(pre-Farina)
The Morris Minor was still used as
the base vehicle. However, just prior to production the company realised that
the Riley 1.5 and Wolseley 1500 suspension was virtually identical to the Minor
and that only slight alteration was required to accept those models steering
rack. This gave the option of much larger brakes.
The B series engine and gearbox
could also be shoehorned in, by the simple expedient of cutting a slot in the
transmission tunnel to allow the gearbox to protrude into the car!� This would
give the car the option of more performance that with the 948cc Minor engine,
particularly if MGA versions of the B series engine was substituted.
Initially the Olympic was sold as a
body/chassis unit only, together with certain special items, such as rear
suspension components etc. Customers rear axles and steering columns were
modified on an exchange basis. The car was therefore advertised as the A
Type Olympic, irrespective as to whether it was supplied for Minor, Riley or
Wolseley components.
A second version was also made
available to utilise the sidevalve Ford E93a components, presumably to sell to
previous GT customers who wanted a more up to date body, but retain their
familiar Ford components. This was advertised as the F type Olympic and the
customer would need to supply a Ford beam axle, which was then converted into a
swing-axle IFS. The customers Ford torque tube was also shortened by RMP.
Not surprisingly this version of the Olympic was not a popular choice, even
though it was £8 cheaper, and very few were sold.
Complete kits were soon introduced,
but only for the A type Olympic. There were three options, namely:
1)
Riley 1.5
2)
Morris Minor
3)
Ford 105E
The latter was in reality the Morris
Minor kit, but with the Ford 105E engine substituted.
Alternative engines could be supplied
at the customers request from the MGA to the Coventry Climax.
The Phase II Olympic was introduced
at the Racing Car Show in January 1963 and although visually similar to the
previous models was actually a complete redesign. The outer shape was
retained, but with the addition of an opening rear hatch and larger bonnet
opening. Underneath and internally the whole design of the monocoque changed,
together with different suspension front and rear.
The Ford 1500cc engine was
standardised. Initially an engine tuned by Harry Ratcliffe could be specified,
although this was soon superseded by the Ford GT version at an additional
cost. Alternative engines, such as the B series could still be specified by
the customer, but were not officially catalogued.
The original BMC based car was still
available, now referred to as a Phase 1. A few owners wanted to use the BMC components,
but liked the practicality of an opening rear hatch. Hence, the company
supplied or modified one or two phase 1 shells to include the opening rear
hatch. In my opinion these are the only ones that can be called Phase 1 1/2,
although this was never a factory designation.
Soon the range was rationalised with
only the Phase II available as a complete kit. The Phase 1 was still made
available, but only as a body/chassis unit. I suspect that by this time
obtaining components from BMC was becoming extremely difficult, particularly in
the small quantities required by RMP.
At some point the company decided
that it would no longer use the Phase 1 moulds. They were however still
listing the Phase 1 body/chassis unit to take BMC suspension components. When
an order was received for these the company supplied a standard Phase 2 shell,
but modified with a Phase 1 front subframe fitted. These cars have, in my
opinion, erroneously been referred to as Phase 1R's. In fact they comprise a
standard Phase 2 shell with slight front end modifications to suit the
different sub-frame. The shells in fact bear no relationship to a standard
Phase 1 shell.
I hope the above goes some way to
unravelling the complexities of Olympic production.
Phase 2 bodyshell
When Les Brown decided he was never
going to build up the unused bodyshell he had acquired and to offer it for
sale, the Club committee quickly decided to buy it from him to use for making
part moulds for body panels. This shell had been bought from RMP in the 70s to
re-shell a car that had been badly damaged, but the owner never got round to
starting the job (familiar story?). The idea of part moulds is that they are
much more portable than the complete mould, are a lot easier to store and as owners
need only panels for repair rather than a complete body, it is more convenient
to get panels made as and when required.
A trip was therefore organised
involving Derek driving to Alan, who had hired a trailer, and then on to
Dewsbury to collect the shell. Les kindly provided a stopover and then the
next day saw a visit to Smith and Deakin in Worcester to get quotes, followed
by a trip to Guy Stallard in Devon, who sportingly agreed to store the shell,
then home, dropping off Alan on the way. Over 700 miles in all.
The shell looks quite odd as it is
not coloured, but is in very good condition, with wide returns on the flanges
and very few drilled holes, so will be ideal for the job.
We hope that the moulds will be done
early next year and panels will be available soon after.
Derek Bentley

Getting
strapped down

All
secured and ready to go